
목차
1. OpenVPN이란?
2. OpenVPN 설치 및 설정
2.1 OpenVPN 설치
2.2 Linux 클라이언트 구성
3. BaroPAM 설치 및 설정
3.1 BaroPAM 설치 전 준비사항
3.2 BaroPAM 설치 모듈 다운로드
3.3 BaroPAM 환경 설정 파일 생성
3.4 BaroPAM 전용 허용 정책 설정
3.5 NTP(Network Time Protocol) 설정
3.5 NTP(Network Time Protocol) 설정
4. OpenVPN 서버와 BaroPAM 구성
4.1 OpenVPN과 FreeRADIUS 연동
4.2 OpenVPN 서버 구성
4.2 BaroPAM 구성
5. OpenVPN 접속 테스트
5.1 신규 사용자 생성
5.2 BaroPAM 환경 설정 파일 생성
5.3 OpenVPN 접속 테스트
6. BaroPAM 적용
6.1 BaroPAM 적용 프로세스
6.2 BaroPAM 적용 화면
6.3 본인확인 적용 프로세스
6.4 본인확인 적용 화면
6.5 OpenVPN 로그인
7. About BaroPAM
1. OpenVPN이란?
가상사설망(VPN, Virtual Private Network)는 별도의 사설 전용망 없이도 암호 기술에 기반한 터널링(tunneling) 프로토콜(통신규약)을 이용해 지점간을 연결함으로써, 저렴한 비용으로 원거리 통신망(WAN)을 구축할 수 있는 네트워크 솔루션을 의미한다.
OpenVPN이란 OpenVPN Technologies, Inc.에서 제작하고 배포하는 오픈소스 VPN 프로토콜과 그 접속 프로그램을 말한다.
TCP와 UDP 프로토콜을 모두 이용 가능한 오픈소스 VPN 프로토콜로서, TAP 또는 TUN 가상 네트워크 어뎁터를 이용해 VPN 연결을 수립한다.
SSL이나 TLS를 이용하여 패킷을 암호화하기 때문에 유효한 CA 인증서가 필요하다. 다만, 굳이 신뢰할 수 있는 CA를 이용하지 않아도 연결에는 문제가 없기 때문에 많은 개인 이용자들은 OpenSSL과 같은 프로그램을 이용해 자가 인증된 인증서를 이용해 VPN 서버를 생성하기도 한다.
L2TP나 PPTP가 막혀 있는 곳에서도 OpenVPN은 연결될 가능성이 높다.
다만 방화벽이 패킷을 일일이 다 까보는 애플리케이션 방화벽이라면 답이 없다. 특히 인터넷 검열에 적극적인 중국과 이집트에선 2013년에 이미 막혔다. 이런 환경에서 OVPN을 쓰려면 cipher를 AES-256-CFB로 설정하거나, SSL 또는 SSH 터널(stunnel 등)로 감싸 주거나, XOR 패치를 쓰거나, Obfsproxy 등의 위장을 갖출 필요가 있다.
OpenVPN 서버를 구축하거나 서버에 접속할 때 쓰인다. 확장자가 ovpn인 OpenVPN 설정 파일을 읽어 들여 동작하는데, 설정 파일은 서버와 클라이언트가 다르지만 확장자는 같아 헷갈릴 수 있다.
클라이언트는 자체적으로 인증서를 읽어올 수 있어 별도로 인증서를 설치하지 않아도 동작한다.
OpenVPN 서버는 무료/오픈소스(GPL)인 OpenVPN Community Edition과, 웹GUI같은 추가 기능을 더 제공하는 유료 OpenVPN Access Server의 2종류가 있다.
OpenVPN Community Edition은 기본적으로 별도의 설정용 GUI를 제공하지 않으므로 커맨드라인과 텍스트 파일만을 이용해서 서버를 구축해야 한다. 하지만 인터넷에서 설정 방법을 얼마든지 찾을 수 있고, DD-WRT와 같은 커스텀 펌웨어가 적용된 라우터와 같이 서드파티 wrapper를 만들어 GUI상에서 서버 구축을 할 수 있도록 해 놓은 경우도 있다.
한편, OpenVPN 클라이언트는 안드로이드(4.0 이상)와 iOS에서 사용할 수 있으며, 대부분의 데스크톱 운영체제를 지원한다. 다만, 현대 모바일 운영체제 중 윈도우폰(7, 8, 10 모두)이나 블랙베리 OS 10, 타이젠에서는 사용 불가. Sailfish OS에서는 서드파티 앱으로 지원한다.

2. OpenVPN 설치 및 설정
2.1 OpenVPN 설치
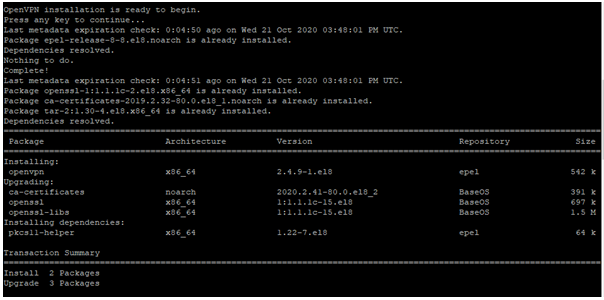
CentOS 7/8 환경에서 OpenVPN을 구성하는 것은 놀랍게도 "예상보다 쉽다". 우선 OpenVPN과 easy-rsa가 필요하다.
1. EPEL 저장소를 선택한 다음 패키지를 설치
이것은 OpenVPN 패키지를 설치하는 데 필요한 모든 종속성과 함께 제공한다.
| [root]# yum -y install epel-release |
2. 서버의 공용 IP 주소를 찾기
OpenVPN 서버를 설정할 때 유용하므로 서버의 공용 IP 주소를 찾는 것이 중요하다.
| [root]# curl ifconfig.me 173.82.115.6 |
3. OpenVPN 설치 스크립트를 다운로드하고 표시된 명령을 실행한다.
| [root]# wget https://raw.githubusercontent.com/Angristan/openvpn-install/master/openvpn-install.sh |
4. OpenVPN 설치 스크립트에 실행 권한 설정
| [root]# chmod +x openvpn-install.sh |
5. OpenVPN 설치 스크립트 실행
| [root]# ./openvpn-install.sh |
6. 먼저 서버의 공용 IP 주소를 제공하라는 메시지가 표시된다. 그 후에는 기본 포트 번호(1194) 및 사용할 프로토콜(UDP/TCP)과 같은 기본 옵션을 사용하는 것이 좋다.

7. 다음으로 기본 DNS 리졸버를 선택하고 압축 및 암호화 설정 모두에 대해 (n) 옵션 없음을 선택한다.

8. 완료되면 스크립트는 다른 소프트웨어 패키지 및 종속성의 설치와 함께 OpenVPN 서버의 설정을 초기화한다.
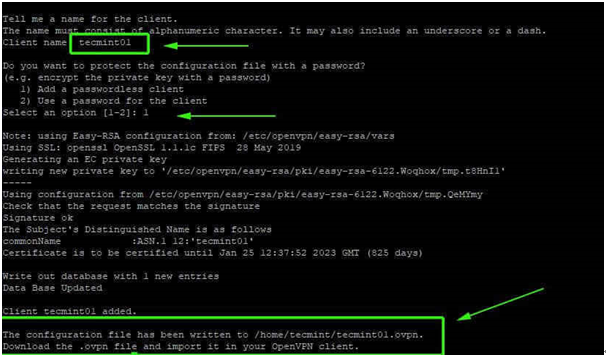
9. 마지막으로 보안 인증서 관리에 사용되는 명령줄 도구인 easy-RSA 패키지를 사용하여 클라이언트 구성 파일을 생성한다.
클라이언트 이름을 입력하고 기본 선택 항목을 사용하기만 하면 된다. 클라이언트 파일은 .ovpn 파일 확장자로 홈 디렉터리에 저장된다.
10. 스크립트가 OpenVPN 서버를 설정하고 클라이언트 구성 파일을 생성하면 터널 인터페이스 tun0이 생성된다. 이것은 클라이언트 PC의 모든 트래픽이 서버로 터널링되는 가상 인터페이스이다.

11. OpenVPN 서버를 시작하고 상태를 확인

2.2 Linux 클라이언트 구성
1. EPEL 리포지토리 및 OpenVPN 소프트웨어 패키지를 설치
| $ sudo yum -y install epel-release $ sudo yum –y install openvpn |
2. 일단 설치되면 scp 명령을 사용하여 작동되는지 테스트
| $ sudo scp -r tecmint@173.82.115.6:/home/tecmint/tecmint01.ovpn . |

3. 클라이언트 파일이 Linux 시스템에 다운로드되면 이제 다음 명령을 사용하여 VPN 서버에 대한 연결을 초기화할 수 있다.
| $ sudo openvpn --config tecmint01.ovpn |
아래에 있는 것과 비슷한 출력을 얻을 수 있다.

4. 새 라우팅 테이블이 생성되고 VPN 서버와의 연결이 설정된다. 다시 가상 인터페이스 터널 인터페이스 tun0이 클라이언트 시스템에 생성된다.
앞서 언급한 바와 같이 이것은 SSL 터널을 통해 모든 트래픽을 OpenVPN 서버로 안전하게 터널링하는 인터페이스이다. 인터페이스는 VPN 서버에 의해 동적으로 IP 주소가 할당된다. 보시다시피 OpenVPN 서버에서 클라이언트 Linux 시스템에 10.8.0.2의 IP 주소를 할당했다.
| $ ifconfig |

5. OpenVPN 서버에 연결되었는지 확인하기 위해 공개 IP를 확인
| $ curl ifconfig.me |

클라이언트 시스템이 VPN의 공개 IP를 선택하여 실제로 OpenVPN 서버에 연결되어 있음을 확인했다. 또는 브라우저를 실행하고 Google 검색 "What's my IP"를 실행하여 공개 IP가 OpenVPN 서버의 IP로 변경되었는지 확인할 수 있다.

참고) OpenVPN에서 2차 인증으로 BaroPAM과 연동하는 방법은 PAM 인증과 Radius 인증 두 가지를 지원하는데, 이 문서에서 PAM 인증을 다루며, Radius인증은 "BaroPAM가이드(RADIUS).doc" 문서를 참조하면 된다.
3. BaroPAM 설치 및 설정
BaroPAM솔루션은 제로 트러스트(Zero Trust) 보안 모델로 정보자산의 보안 강화를 위하여 2차 인증(추가 인증)이 필요한 다양한 운영체제와 애플리케이션에 누구나 손쉽게 곧바로 적용할 수 있는 플러그인 가능한 인증 모듈(PAM, Pluggable Authentication Module) 방식을 기반으로 하는 보안에 최적화된 생체인식이 적용된 3단계 인증 솔루션이다.

본 BaroPAM 솔루션에는 설치일로부터 6개월간 유효한 평가용(Evaluation) 라이선스가 적용되어 무료 체험이 가능하며, 이후에는 라이선스 갱신이 필요하다.
3.1 BaroPAM 설치 전 준비사항
PAM 모듈을 사용하기 위해서는 기본적으로 PAM 패키지가 반드시 설치되어 있어야 한다. 설치 확인은 다음의 명령어를 실행하여 확인한다. 만약, 설치되어 있지 않으면 Redhat, CentOS는 "dnf -y install *pam*" 그외는 "sudo apt-get install pam" 명령어로 설치하면 된다.
| [root]# rpm -qa | grep pam pam_smb-1.1.7-7.2.1 pam_passwdqc-1.0.2-1.2.2 pam-0.99.6.2-14.el5_11 pam_krb5-2.2.14-22.el5 pam-devel-0.99.6.2-14.el5_11 pam_ccreds-3-5 pam_smb-1.1.7-7.2.1 pam_pkcs11-0.5.3-26.el5 pam-devel-0.99.6.2-14.el5_11 pam_passwdqc-1.0.2-1.2.2 pam-0.99.6.2-14.el5_11 pam_ccreds-3-5 pam_krb5-2.2.14-22.el5 pam_pkcs11-0.5.3-26.el5 |
CentOS 7/8 인스턴스에 IPv4 전달이 활성화하기 위하여 다음과 같이 설정한다.
| [root] /etc > vi /etc/sysctl.conf net.ipv4.ip_forward=1 |
BaroPAM 인증 모듈을 다운로드 및 설치하기 위해서 root 계정으로 접속한 후 모듈을 다운로드 및 설치하기 위한 디렉토리(/usr/baropam)를 다음과 같이 생성한다.
| [root]# mkdir /usr/baropam |
BaroPAM 모듈을 다운로드 및 설치하기 위한 디렉토리의 권한(읽기, 쓰기, 실행)을 다음과 같이 부여한다.
| [root]# chmod 777 /usr/baropam |
3.2 BaroPAM 설치 모듈 다운로드
BaroPAM 인증 모듈은 root 계정으로 접속한 후 모듈을 다운로드 및 설치하기 위한 디렉토리(/usr/baropam)로 이동하여 모듈을 다운로드 하는 방법은 다음과 같다.
| [root] /usr/baropam > wget http://nuriapp.com/download/libpam_baro_auth-x.x.tar |
BaroPAM 인증 모듈의 다운로드가 완료되면 tar 파일의 압축을 해제하는 방법은 다음과 같다.
| [root] /usr/baropam > tar -xvf libpam_baro_auth-x.x.tar |
BaroPAM 인증 모듈의 압축을 해제하면 baropam 디렉토리에 다음과 같은 BaroPAM 관련 모듈이 생성된다.
| [root] /usr/baropam > ls -al 합계 180 drwxrwxrwx 7 root root 4096 8월 23 09:59 . drwxr-xr-x 17 root root 4096 2월 10 2017 .. -r--r--r-- 1 root root 8 3월 24 2021 .baro_acl -r--r--r-- 1 root root 305 7월 2 14:41 .baro_auth -r--r--r-- 1 root root 290 6월 30 12:55 .baro_curl -rwxr-xr-x 1 root root 69149 4월 6 19:12 baro_auth -rwxr-xr-x 1 root root 65072 6월 29 16:36 baro_curl drwxr-xr-x 2 root root 4096 7월 20 2021 jilee -rwxr-xr-x 1 root root 152649 6월 9 08:19 pam_baro_auth.so -rwxr-xr-x 1 root root 116158 6월 30 12:54 pam_baro_curl.so -rw-r--r-- 1 root root 150 6월 29 16:29 setcurl.sh -rw-r--r-- 1 root root 221 6월 27 15:59 setenv.sh |
3.3 BaroPAM 환경 설정 파일 생성
BaroPAM 환경 설정 파일은 baro_auth 프로그램을 실행하여 반드시 생성하는데, BaroPAM 인증 모듈의 디렉토리인 /usr/baropam 밑에 위치 하도록 한다.
형식)
| baro_auth -r rate_limit -R rate_time -t cycle_time –k key_method –e encrypt_flag -A acl_type -a acl_filename -S secure_key -s filename |
BaroPAM 환경설정 파일의 설정 옵션에 대한 내용은 다음과 같다.
| 옵션 | 설명 | 설정값 | 비고 |
| -r | 일회용 인증키의 제한횟수(1~10) | 3 | |
| -R | 일회용 인증키의 제한시간(초, 15~600초) | 30 | |
| -t | 일회용 인증키의 인증주기(초, 3~60초) | 30 | |
| -k | 일회용 인증키의 인증방식(app1, app256, app384, app512). | app512 | |
| -e | 환경설정 파일의 암호화 여부(yes or no) | no | |
| -A | 2차 인증에서 허용(allow) 또는 제외(deny)할지 선택 | deny | |
| -a | 2차 인증에서 허용(allow) 또는 제외(deny)할 계정에 대한 ACL 파일명(파일 접근권한은 444) | /usr/baropam/.baro_acl | |
| -S | 벤더에서 제공하는 Secure key(라이선스 키)를 사용해야 하는데, OpenVPN 특성상 사용자별 폰번호로 대체. | 01012341234 | |
| -s | BaroPAM 환경설정 파일을 생성할 디렉토리를 포함한 파일명 | /usr/baropam/.baro_auth |
주의) –s 옵션의 filename는 BaroPAM 환경설정 파일을 생성할 디렉토리를 포함한 파일명(파일 접근권한은 444)이다.
| [root] /usr/baropam > ./baro_auth -r 3 -R 30 -t 30 –k app512 –e no -A deny -a ~/.baro_acl -S 01012341234 -s /usr/baropam/.baro_auth |
1) Your emergency one-time authentication keys are :
응급 일회용 인증키는 일회용 인증키 생성기인 BaroPAM 앱을 사용할 수 없을 때 분실한 경우를 대비하여 SSH 서버에 다시 액세스하는데 사용할 수 있는 접속이 가능한 Super 인증키 이므로 어딘가에 적어 두는 것이 좋다.
2) 다음에 나오는 물음에 대해서는 모두 "y"를 입력한다.
"/usr/baropam/.baro_auth" 파일을 업데이트하시겠습니까 (y/n) y
중간자(man-in-the-middle) 공격을 예방할 것인가 (y/n) y
BaroPAM 환경 설정 파일인 .baro_auth에 설정한 내용은 다음과 같다.
| [root] /usr/baropam > cat .baro_auth " AUTH_KEY " RATE_LIMIT 3 30 " KEY_METHOD app512 " CYCLE_TIME 30 " SECURE_KEY 01012341234 " ACL_NAME /usr/baropam/.baro_acl " ACL_TYPE deny " DISALLOW_REUSE 33458936 19035576 15364353 54649370 84342192 |
BaroPAM 환경설정 파일인 .baro_auth의 설정 항목에 대한 내용은 다음과 같다.
| 항목 | 설명 | 설정값 | 비고 |
| AUTH_KEY | 인증 구분자(고정) | ||
| RATE_LIMIT | 일회용 인증키의 제한횟수(1~10), 제한시간(초, 15~600초) | 3 30 | |
| KEY_METHOD | 일회용 인증키의 인증방식(app1, app256, app384, app512) | app512 | |
| CYCLE_TIME | 일회용 인증키의 인증주기(초, 3~60초) | 30 | |
| SECURE_KEY | 벤더에서 제공하는 Secure key(라이선스 키)를 사용해야 하는데, OpenVPN 특성상 사용자별 폰번호로 대체. | 01012341234 | |
| ACL_TYPE | 2차 인증에서 허용(allow) 또는 제외(deny) 구분 | deny | |
| ACL_NAME | 2차 인증에서 허용 또는 제외할 계정에 대한 ACL Filename(파일 접근권한은 444) | /usr/baropam/.baro_acl | |
| DISALLOW_REUSE or ALLOW_REUSE |
중간자(man-in-the-middle) 공격을 예방할 경우는 "DISALLOW_REUSE"을 설정한 경우 일회용 인증키의 인증주기 동안은 다른 사용자가 로그인 할 수 없으며, 만약 허용할 경우는 "ALLOW_REUSE"을 설정한다. | DISALLOW_REUSE |
BaroPAM 모듈 사용 시 2차 인증에서 제외할 계정에 대한 ACL에 제외해야 하는 경우 BaroPAM 환경 설정 시 설정한 디렉토리에 ACL(Access Control List) 파일을 생성한 후 제외할 계정을 다음과 같이 입력한다. (.baro_acl에 대한 파일 접근권한을 444로 설정해야 한다.)
| [root] /usr/baropam > vi .baro_acl barokey baropam |
3.4 BaroPAM 전용 허용 정책 설정
SELinux(Security-Enhanced Linux)는 리눅스 시스템의 보안을 강화하기 위해 강제 접근 제어(MAC, Mandatory Access Control) 방식을 구현한 커널 보안 모듈이다.
쉽게 비유하자면, 기존 리눅스 권한이 "권한을 가진 사용자은 모든 계정에 들어갈 수 있다"는 방식이라면, SELinux는 "권한이 있어도 허가된 특정 계정의 특정 모듈(또는 파일)만 건드릴 수 있다"라고 제한하는 '철저한 감시관' 역할을 한다.
① 주요 역할 및 특징
첫번째, 강제 접근 제어 (MAC) 구현
기존의 전통적인 리눅스 권한 방식(DAC: Discretionary Access Control)은 파일 소유자가 권한(777 등)을 마음대로 줄 수 있어, 해커가 root 권한을 탈취하면 시스템 전체가 장악되는 약점이 있었다.
SELinux 의 차별점으로 시스템 관리자가 설정한 보안 정책이 우선한다. 설령 777 권한의 파일이라도 정책상 허용되지 않은 프로세스는 접근할 수 없다.
두번째, 최소 권한 원칙 (Principle of Least Privilege)
프로세스가 동작하는 데 꼭 필요한 권한만 부여한다.
예) 웹 서버(Apache) 프로세스는 웹 콘텐츠 디렉터리(httpd_sys_content_t)만 읽을 수 있고, 사용자 홈 디렉터리나 시스템 설정 파일에는 접근할 수 없도록 차단한다.
세번째, 보안 컨텍스트(Context) 기반 관리
모든 파일, 프로세스, 네트워크 포트에 "라벨(Label)"을 붙여 관리한다.
형식) 사용자(User):역할(Role):타입(Type):레벨(Level)
이 중 "타입(Type)"이 가장 핵심이며, 프로세스 타입과 파일 타입이 일치해야만 접근을 허용한다. (이를 Type Enforcement 라고 부른다.)
② 필요한 이유
만약 해커가 웹 서버의 취약점을 이용해 시스템에 침투했다고 가정해 보면. SELinux 가 없을 때는 해커는 웹 서버(root 권한)를 통해 /etc/shadow(비밀번호 파일)를 훔치거나 인증 모듈을 변조할 수 있다.
SELinux 가 있을 때는 웹 서버 프로세스가 /etc/shadow 에 접근하려고 하면, SELinux 가 "웹 서버 타입은 시스템 비밀번호 타입을 읽을 권한이 없다"며 즉시 차단한다. root 권한이라도 예외는 없다.
③ 설정 방법
기존에는 BaroPAM 환경 설정 시 Redhat 계열에서 "/etc/sysconfig/selinux" 파일의 항목 중 "SELINUX=disabled" 시켰는데, 앞으로는 "/etc/sysconfig/selinux" 파일을 변경하지 않고, 다음과 같은 순서대로 진행해야 한다.
첫번째, /usr/baropam 디렉토리 권한 해제
| [root@baropam baropam]# chattr -i /usr/baropam |
두번째, SELinux 를 Permissive 모드로 변경 (로그 수집용)
| [root@baropam baropam]# setenforce 0 [root@baropam baropam]# getenforce Permissive |
세번째, BaroPAM 테스트(sshd, su, sudo, login, gdm-password 등)
환경 설정 모듈인 pam_baro_auth.so(기본), pam_baro_sql.so(웹 콘솔을 사용하는 경우)
네번째, audit2allow 도구 설치
| CentOS 8 / Rocky Linux / RHEL 8 이상: [root@baropam baropam]# dnf -y install policycoreutils-python-utils CentOS 7 이하: [root@baropam baropam]# yum -y install policycoreutils-python Ubuntu / Debian: Selinux 를 사용하는 경우 [root@baropam baropam]# apt -y install policycoreutils 설치 확인 [root@baropam baropam]# audit2allow --version audit2allow .1 |
다섯번째, 정책 파일 위치 확인
| [root@baropam baropam]# ls /etc/selinux/targeted/policy/ policy.33 |
여섯번째, 거부된 내역(denied)을 찾아 BaroPAM 전용 허용 정책 생성
| [root@baropam baropam]# grep "denied" /var/log/audit/audit.log | audit2allow -M baropam_policy -p /etc/selinux/targeted/policy/policy.33 ******************** 중대한 *********************** 이 정책 꾸러미를 활성화하려면 다음을 실행하세요: semodule -i baropam_policy.pp |
일곱번째, 생성된 정책 모듈 등록
| [root@baropam baropam]# semodule -i baropam_policy.pp |
여덟번째, /usr/baropam 디렉토리를 '인증 데이터 전용' 구역으로 선언
| [root@baropam baropam]# semanage fcontext -a -t auth_cache_t "/usr/baropam(/.*)?" File context for /usr/baropam(/.*)? already defined, modifying instead |
아홉번째, 실제 파일들에 적용
| [root@baropam baropam]# restorecon -Rv /usr/baropam |
열번째, SELinux 를 Enforcing 모드로 변경
| [root@baropam baropam]# setenforce 1 [root@baropam baropam]# getenforce Enforcing |
열한번째, BaroPAM 테스트(sshd, su, sudo, login, gdm-password 등)
3.5 NTP(Network Time Protocol) 설정
BaroPAM은 시간 동기화 방식이므로 서버의 시간이 현재 시간과 다를 경우 일회용 인증키가 서로 일치하지 않아서 서버에 로그인을 못하는 경우가 발생할 수 있다.
최근에는 정보자산에 대한 시간 동기화(타임서버 시간 동기화)하는 방법으로 NTP(Network Time Protocol)을 이용하여 root 계정에서 시스템의 시각을 현재 시각으로 설정할 수 있다.
NTP를 사용하기 위해서는 기본적으로 NTP 패키지가 반드시 설치되어 있어야 한다. 설치 확인은 다음의 명령어를 실행하여 확인한다. 만약, 설치되어 있지 않으면 Redhat, CentOS 8 이하 버젼은 "yum install ntp" 그외는 "sudo apt-get install ntp" 명령어로 설치하면 된다.
| [root]# rpm -qa | grep ntp ntp-4.2.2p1-18.el5.centos chkfontpath-1.10.1-1.1 |
ntpd 서비스를 서버 부팅 시 시작프로그램에 등록 및 ntp 활성화 여부 확인은 다음과 같은 명령어로 확인할 수 있다.
| [root]# chkconfig ntpd on [root]# chkconfig --list | grep ntp ntpd 0:해제 1:해제 2:활성 3:활성 4:활성 5:활성 6:해제 |
chkconfig 이용하여 서버 부팅시 ntpd 데몬 활성화 여부 확인 3, 5 level에 off(해제) 가 되어 있으면 자동 활성화되지 않는다. 자동 활성화하기 위해서는 3, 5에 on(활성)으로 다음과 같은 명령어로 변경해야 한다.
| [root]# chkconfig --level 3 ntpd on [root]# chkconfig --level 5 ntpd on |
우리나라에서 운영되고 있는 NTP 서버는 다음과 같다.
| server kr.pool.ntp.org server time.bora.net |
우리나라에서 운영되고 있는 NTP 서버를 ntpd 데몬 설정을 위한 설정 파일인 "/etc/ntp.conf"에 다음과 같이 설정한다.
| [root]# vi /etc/ntp.conf # Use public servers from the pool.ntp.org project. # Please consider joining the pool (http://www.pool.ntp.org/join.html). #server 0.centos.pool.ntp.org #server 1.centos.pool.ntp.org #server 2.centos.pool.ntp.org #server 3.centos.pool.ntp.org server kr.pool.ntp.org iburst minpoll 7 maxpoll 10 server time.bora.net iburst minpoll 7 maxpoll 10 |
iburst 옵션은 일종의 옵션 설정으로써 동기화 하는데 걸리는 시간을 짧게 줄여주는 옵션임.
minpoll과 maxpoll 옵션은 NTP 설정에서 NTP 서버에 시간 정보를 요청하는 주기(Polling Interval)의 최소 및 최대 간격을 설정하는 옵션이다.
이 값들은 초 단위의 시간이 아니라, 2의 거듭제곱으로 계산되는 지수 값이다.
실제 폴링 간격(초) = 2설정 값
minpoll(최소 폴링 간격) 옵션은 NTP 클라이언트가 NTP 서버에 시간 정보를 요청하는 가장 짧은 최소 간격을 의미한다.
기본값은 일반적으로 6으로 설정되어 있다. 26 = 64초, 즉 64초마다 한 번씩 요청함을 의미다.
설정 범위는 일반적으로 3 (8초) 에서부터 설정 가능하며, 환경에 따라 허용 범위가 다를 수 있다.
maxpoll(최대 폴링 간격) 옵션은 NTP 클라이언트가 NTP 서버에 시간 정보를 요청하는 가장 긴 최대 간격을 의미한다.
기본값은 일반적으로 10으로 설정되어 있다. 210 = 1024초, 즉 1024초마다 한 번씩 요청함을 의미한다.
설정 범위는 일반적으로 17 (약 36.4시간) 까지 설정 가능하며, 환경에 따라 허용 범위가 다를 수 있다.
NTP는 시스템 클럭의 정확도가 높아지면 폴링 간격을 점차 늘려(maxpoll 값에 가까워지게) 네트워크 트래픽을 줄인다. 반대로 클럭의 오차가 커지거나 불안정해지면 폴링 간격을 줄여(minpoll 값에 가까워지게) 빠르게 동기화 상태를 회복하려고 한다. 이 두 값은 NTP 동기화의 유연성과 효율성을 결정하는 중요한 요소다.
ntpd 데몬 설정을 위한 설정이 끝나면 반드시 NTP 설정이 제대로 추가되었는지 확인한 후 NTP 데몬의 Restart 작업이 반드시 필요하다.
| [root]# /etc/init.d/ntpd restart ntpd를 종료 중: [ OK ] ntpd (을)를 시작 중: [ OK ] |
ntpd 시간 확인은 다음과 같은 명령어로 확인할 수 있다.
| [root]# ntpq -p remote refid st t when poll reach delay offset jitter ============================================================================== static.betaidc. 106.247.248.106 3 u 7 64 1 2.884 287.718 0.001 time.bora.net .INIT. 16 u - 64 0 0.000 0.000 0.000 183.110.225.61 .INIT. 16 u - 64 0 0.000 0.000 0.000 LOCAL(0) .LOCL. 10 l 4 64 1 0.000 0.000 0.001 |
* 표시된 ip 가 현재 시간을 가져오고 있는 ntp 서버임
NTP를 사용하기 위해서는 기본적으로 NTP 패키지가 반드시 설치되어 있어야 한다. 설치 확인은 다음의 명령어를 실행하여 확인한다. 만약, 설치되어 있지 않으면 Redhat, CentOS 8 이상 버젼은 "yum install chrony" 명령어로 설치하면 된다.
| [root]# rpm -qa | grep chrony chrony-3.5-1.el8.x86_64 |
우리나라에서 운영되고 있는 NTP 서버는 다음과 같다.
| server kr.pool.ntp.org server time.bora.net server time.kornet.net |
우리나라에서 운영되고 있는 NTP 서버를 ntpd 데몬 설정을 위한 설정 파일인 "/etc/chrony.conf"에 다음과 같이 설정한다.
| [root]# vi /etc/chrony.conf # Use public servers from the pool.ntp.org project. # Please consider joining the pool (http://www.pool.ntp.org/join.html). #pool 2.centos.pool.ntp.org iburst server kr.pool.ntp.org iburst minpoll 7 maxpoll 10 server time.bora.net iburst minpoll 7 maxpoll 10 # Record the rate at which the system clock gains/losses time. driftfile /var/lib/chrony/drift # Allow the system clock to be stepped in the first three updates # if its offset is larger than 1 second. makestep 1.0 3 # Enable kernel synchronization of the real-time clock (RTC). rtcsync # Enable hardware timestamping on all interfaces that support it. #hwtimestamp * # Increase the minimum number of selectable sources required to adjust # the system clock. #minsources 2 # Allow NTP client access from local network. allow 192.168.0.0/16 # Serve time even if not synchronized to a time source. #local stratum 10 # Specify file containing keys for NTP authentication. keyfile /etc/chrony.keys # Get TAI-UTC offset and leap seconds from the system tz database. leapsectz right/UTC # Specify directory for log files. logdir /var/log/chrony # Select which information is logged. #log measurements statistics tracking |
ntpd 데몬 설정을 위한 설정이 끝나면 반드시 NTP 설정이 제대로 추가되었는지 확인한 후 NTP 데몬의 Restart 작업이 반드시 필요하다. (chrony 서비스 시작 및 부팅시 구동 등록)
| [root]# sudo systemctl enable chronyd [root]# sudo systemctl restart chronyd |
ntpd 시간 확인은 다음과 같은 명령어로 확인할 수 있다.
시간을 받아오는 서버 리스트 / chrony.conf 파일에 등록한 server 리스트)
| [root]# chronyc sources 210 Number of sources = 2 MS Name/IP address Stratum Poll Reach LastRx Last sample =============================================================================== ^* ec2-54-180-134-81.ap-nor> 2 6 377 43 -349us[-1059us] +/- 24ms ^- time.bora.net 2 6 377 42 +1398us[+1398us] +/- 90ms |
시간을 받아오는 서버 정보)
| [root]# chronyc tracking Reference ID : 36B48651 (ec2-54-180-134-81.ap-northeast-2.compute.amazonaw) Stratum : 3 Ref time (UTC) : Sun Mar 22 07:07:43 2020 System time : 0.000130027 seconds slow of NTP time Last offset : -0.000710122 seconds RMS offset : 0.000583203 seconds Frequency : 19.980 ppm fast Residual freq : +0.142 ppm Skew : 3.235 ppm Root delay : 0.013462566 seconds Root dispersion : 0.017946836 seconds Update interval : 65.0 seconds Leap status : Normal |
시간 상태 및 동기화 등 정보 확인)
| [root]# timedatectl status Local time: Sun 2020-03-22 16:08:45 KST Universal time: Sun 2020-03-22 07:08:45 UTC RTC time: Sun 2020-03-22 07:08:44 Time zone: Asia/Seoul (KST, +0900) System clock synchronized: yes NTP service: active RTC in local TZ: no |
4. OpenVPN 서버와 BaroPAM 구성
OpenVPN 서버와 BaroPAM을 구성하는 방법은 다음과 같은 두가지 방법이 있다.
첫번째로 OpenVPN 서버의 PAM과 연동
두번째로 OpenVPN과 FreeRADIUS을 연동
4.1 OpenVPN과 FreeRADIUS 연동
OpenVPN과 FreeRADIUS 연동은 "radiusplugin_v2.1a_beta1d"을 설치하여 기존 PAM 인증을 대체 할 수 있도록 플러그인 모듈을 설치해야 한다. (RADIUS 관련 사항은 "BaroPAM 가이드(RADIUS)" 참조)
| [root]# cd /usr/local/src/ [root]# wget http://www.nongnu.org/radiusplugin/radiusplugin_v2.1a_beta1.tar.gz [root]# yum install libgcrypt* [root]# tar xvzf radiusplugin_v2.1a_beta1.tar.gz [root]# cd radiusplugin_v2.1a_beta1/ [root]# yum -y install gcc [root]# yum -y install gcc-c++ [root]# make [root]# cp radiusplugin.cnf /etc/openvpn/ [root]# cp radiusplugin.so /etc/openvpn/ [root]# cd /etc/openvpn |
플러그인 모듈의 환경 설정 파일인 "radiusplugin.cnf"에서 RADIUS 서버 환경 설정 시 설정한 서버 주소 및 sharedsecret을 동일하게 설정해야 한다.
| [root]# vi /etc/openvpn/radiusplugin.cnf # The NAS identifier which is sent to the RADIUS server NAS-Identifier=OpenVpn # The service type which is sent to the RADIUS server Service-Type=5 # The framed protocol which is sent to the RADIUS server Framed-Protocol=1 # The NAS port type which is sent to the RADIUS server NAS-Port-Type=5 # The NAS IP address which is sent to the RADIUS server NAS-IP-Address=127.0.0.1 # Path to the OpenVPN configfile. The plugin searches there for # client-config-dir PATH (searches for the path) # status FILE (searches for the file, version must be 1) # client-cert-not-required (if the option is used or not) # username-as-common-name (if the option is used or not) OpenVPNConfig=/etc/openvpn/server.conf # Support for topology option in OpenVPN 2.1 # If you don't specify anything, option "net30" (default in OpenVPN) is used. # You can only use one of the options at the same time. # If you use topology option "subnet", fill in the right netmask, e.g. from OpenVPN option "--server NETWORK NETMASK" subnet=255.255.255.0 # If you use topology option "p2p", fill in the right network, e.g. from OpenVPN option "--server NETWORK NETMASK" # p2p=10.8.0.1 # Allows the plugin to overwrite the client config in client config file directory, # default is true overwriteccfiles=true # Allows the plugin to use auth control files if OpenVPN (>= 2.1 rc8) provides them. # default is false # useauthcontrolfile=false # Only the accouting functionality is used, if no user name to forwarded to the plugin, the common name of certificate is used # as user name for radius accounting. # default is false # accountingonly=false # If the accounting is non essential, nonfatalaccounting can be set to true. # If set to true all errors during the accounting procedure are ignored, which can be # - radius accounting can fail # - FramedRouted (if configured) maybe not configured correctly # - errors during vendor specific attributes script execution are ignored # But if set to true the performance is increased because OpenVPN does not block during the accounting procedure. # default is false nonfatalaccounting=false # Path to a script for vendor specific attributes. # Leave it out if you don't use an own script. # vsascript=/root/workspace/radiusplugin_v2.0.5_beta/vsascript.pl # Path to the pipe for communication with the vsascript. # Leave it out if you don't use an own script. # vsanamedpipe=/tmp/vsapipe # A radius server definition, there could be more than one. # The priority of the server depends on the order in this file. The first one has the highest priority. server { # The UDP port for radius accounting. acctport=1813 # The UDP port for radius authentication. authport=1812 # The name or ip address of the radius server. # name=192.168.0.153 name=127.0.0.1 # How many times should the plugin send the if there is no response? retry=1 # How long should the plugin wait for a response? wait=1 # The shared secret. sharedsecret=baropam } |
4.2 OpenVPN 서버 구성
OpenVPN은 기존 PAM 인증 방식에서 RADIUS 모듈로 로그인 될 수 있도록 기존 설정 주석 후 모듈 플러그인 지시자를 추가한다는 점을 제외하면 표준 OpenVPN 서버 구성이다.
| [root]# vi /etc/openvpn/server.conf port 51194 proto tcp dev tun user nobody group nobody persist-key persist-tun keepalive 10 120 topology subnet server 10.99.0.0 255.255.255.0 ifconfig-pool-persist ipp.txt push "dhcp-option DNS 192.168.33.10" push "dhcp-option DNS 192.168.33.1" push "route 10.99.0.0 255.255.255.0" push "route 192.168.33.0 255.255.255.0" push "redirect-gateway def1 bypass-dhcp" dh none ecdh-curve prime256v1 tls-crypt tls-crypt.key crl-verify crl.pem ca ca.crt cert server_h84bYsnVsqSFo8h7.crt key server_h84bYsnVsqSFo8h7.key auth SHA256 cipher AES-128-GCM ncp-ciphers AES-128-GCM tls-server tls-version-min 1.2 tls-cipher TLS-ECDHE-ECDSA-WITH-AES-128-GCM-SHA256 client-config-dir /etc/openvpn/ccd status /var/log/openvpn/status.log verb 3 #PAM username-as-common-name auth-nocache #plugin /usr/lib64/openvpn/plugins/openvpn-plugin-auth-pam.so login #plugin /usr/lib64/openvpn/plugins/openvpn-plugin-auth-pam.so "openvpn login USERNAME password PASSWORD pin OTP" plugin /etc/openvpn/radiusplugin.so /etc/openvpn/radiusplugin.cnf |
이 구성은 TCP 포트 1194에서 openvpn 서버를 생성한다. 기본값은 UDP를 사용하는 것이지만 신뢰할 수 없는 네트워크에서 TCP가 더 잘 작동한다는 것을 알았다.
참고)
| [root@vpntest ~]# ifconfig ens33: flags=4163<UP,BROADCAST,RUNNING,MULTICAST> mtu 1500 inet 192.168.33.50 netmask 255.255.255.0 broadcast 192.168.33.255 inet6 fe80::250:56ff:fe8b:8828 prefixlen 64 scopeid 0x20<link> ether 00:50:56:8b:88:28 txqueuelen 1000 (Ethernet) RX packets 2144 bytes 221198 (216.0 KiB) RX errors 0 dropped 0 overruns 0 frame 0 TX packets 1118 bytes 640315 (625.3 KiB) TX errors 0 dropped 0 overruns 0 carrier 0 collisions 0 lo: flags=73<UP,LOOPBACK,RUNNING> mtu 65536 inet 127.0.0.1 netmask 255.0.0.0 inet6 ::1 prefixlen 128 scopeid 0x10<host> loop txqueuelen 1000 (Local Loopback) RX packets 6 bytes 651 (651.0 B) RX errors 0 dropped 0 overruns 0 frame 0 TX packets 6 bytes 651 (651.0 B) TX errors 0 dropped 0 overruns 0 carrier 0 collisions 0 tun0: flags=4305<UP,POINTOPOINT,RUNNING,NOARP,MULTICAST> mtu 1500 inet 10.99.0.1 netmask 255.255.255.0 destination 10.99.0.1 inet6 fe80::4747:2667:f522:c8bb prefixlen 64 scopeid 0x20<link> unspec 00-00-00-00-00-00-00-00-00-00-00-00-00-00-00-00 txqueuelen 100 (UNSPEC) RX packets 30 bytes 3735 (3.6 KiB) RX errors 0 dropped 0 overruns 0 frame 0 TX packets 38 bytes 7539 (7.3 KiB) TX errors 0 dropped 0 overruns 0 carrier 0 collisions 0 virbr0: flags=4099<UP,BROADCAST,MULTICAST> mtu 1500 inet 192.168.122.1 netmask 255.255.255.0 broadcast 192.168.122.255 ether 52:54:00:1e:bf:88 txqueuelen 1000 (Ethernet) RX packets 0 bytes 0 (0.0 B) RX errors 0 dropped 0 overruns 0 frame 0 TX packets 0 bytes 0 (0.0 B) TX errors 0 dropped 0 overruns 0 carrier 0 collisions 0 |
4.3 BaroPAM 구성
OpenVPN 특성상 사용자별 계정마다 BaroPAM 환경 설정파일을 각각 설정하기 위하여 BaroPAM 환경 설정파일전용 디렉토리(/usr/baropam/openvpn)를 다음과 같이 생성한다.
| [root]# mkdir /usr/baropam/openvpn |
BaroPAM 환경 설정파일전용 디렉토리(/usr/baropam/openvpn)의 권한(읽기, 쓰기)을 다음과 같이 부여한다.
| [root]# chmod -R 755 /usr/baropam/openvpn |
1) OpenVPN 서버 PAM 연동인 경우
OpenVPN 특성상 사용자별 계정마다 BaroPAM 환경 설정파일을 각각 설정하는 경우 BaroPAM 모듈을 설정하기 위해서 /etc/pam.d/login 파일에 설정하는 방법은 다음과 같이 최 상단에 입력해 준다.
| [root] /usr/baropam > vi /etc/pam.d/login #%PAM-1.0 auth required /usr/baropam/pam_baro_auth.so forward_pass secret=/usr/baropam/openvpn/.${USER}_auth encrypt=no |
참고로 secret 파라미터는 BaroPAM 환경설정 파일명, encrypt 파라미터는 BaroPAM 환경설정 파일의 암호화 플래그(yes or no)를 설정한다.
forward_pass를 이용하여 암호 입력창(Password:)에 암호와 같이 일회용 인증키를 입력할 경우, 암호를 먼저 입력하고 공백 없이 이어서 일회용 인증키를 입력하면 된다. 예를 들어 암호가 "baropam" 이고 일회용 인증키가 "123456" 이라면 "baropam123456"으로 입력하면 된다.
forward_pass를 이용하면 인증을 필요로 하는 대부분의 서비스에 2-factor 인증을 가능하게 할 수 있다.
2) FreeRADIUS 연동인 경우
OpenVPN 특성상 사용자별 계정마다 BaroPAM 환경 설정파일을 각각 설정하는 경우 BaroPAM 모듈을 설정하기 위해서 /etc/pam.d/radiusd 파일에 설정하는 방법은 다음과 같이 최 상단에 입력해 준다.
| [root] /usr/baropam > vi /etc/pam.d/radiusd #%PAM-1.0 auth required /usr/baropam/pam_baro_auth.so forward_pass secret=/usr/baropam/openvpn/.${USER}_auth encrypt=no |
참고로 secret 파라미터는 BaroPAM 환경설정 파일명, encrypt 파라미터는 BaroPAM 환경설정 파일의 암호화 플래그(yes or no)를 설정한다.
forward_pass를 이용하여 암호 입력창(Password:)에 암호와 같이 일회용 인증키를 입력할 경우, 암호를 먼저 입력하고 공백 없이 이어서 일회용 인증키를 입력하면 된다. 예를 들어 암호가 "baropam" 이고 일회용 인증키가 "123456" 이라면 "baropam123456"으로 입력하면 된다.
forward_pass를 이용하면 인증을 필요로 하는 대부분의 서비스에 2-factor 인증을 가능하게 할 수 있다.
5. OpenVPN 접속 테스트
5.1 신규 사용자 생성
OpenVPN 신규 사용자를 생성하기 위하여 OpenVPN 설치 스크립트를 실행하여 신규 사용자를 생성한다.
| [root]# ./openvpn-install.sh Welcome to OpenVPN-install! The git repository is available at: https://github.com/angristan/openvpn-install It looks like OpenVPN is already installed. What do you want to do? 1) Add a new user 2) Revoke existing user 3) Remove OpenVPN 4) Exit Select an option [1-4]: 1 ……… |
신규 사용자를 생성하면 사용자 홈 디렉토리에 Openvpn client connect를 이용하여 접속시 필요한 profile인 "Client name.ovpn" 파일이 생성된다.
5.2 BaroPAM 환경 설정 파일 생성
사용자의 로그인 정보(로그인-ID, 폰번호) 관련 쉘 스크립트를 실행하기 위하여 BaroPAM 등록 디렉토리(/usr/baropam/openvpn)로 이동하여 실행한다.
참고) 쉘 스크립트 실행 시 인수나 인수값의 구분은 공백(space)으로 해야 한다.
1) 신규 사용자의 BaroPAM 환경설정 파일을 생성하는 쉘 스크립트 - setuser.sh
#!/bin/sh
export LANG=C
ENV_HOME=/usr/baropam/radius;
ACC_HOME=/home/$1
userdel -rf $1
\rm ${ENV_HOME}/.$1_auth
useradd -d ${ACC_HOME} -m -s /bin/bash $1
echo "$1:$2" | chpasswd
\cp ${ENV_HOME}/.baro_auth ${ENV_HOME}/.$1_auth
sed -i "s/01012341234/$3/g" ${ENV_HOME}/.$1_auth
신규 사용자(로그인-ID)의 BaroPAM의 환경 설정 파일을 생성하는 쉘 스크립트(setuser.sh) 실행 시 파라미터는 다음과 같다.
$1 : 생성할 로그인-ID
$2 : 로그인-ID의 폰번호
| [root]# sh setuser.sh nurit !@Baropam# 01027714076 |
2) 사용자(로그인-ID)의 비밀번호를 변경하는 쉘 스크립트 - setpasswd.sh
| #!/bin/sh export LANG=C echo "$1:$2" | chpasswd |
사용자(로그인-ID)의 비밀번호를 변경하는 쉘 스크립트(setpasswd.sh) 실행 시 파라미터는 다음과 같다.
$1 : 로그인-ID
$2 : 변경할 비밀번호
| [root]# sh setpasswd.sh nurit !@Baropam# |
3) 사용자(로그인-ID)의 폰번호를 변경하는 쉘 스크립트 - setphone.sh
| #!/bin/sh export LANG=C ENV_HOME=/usr/baropam/openvpn; sed -i "s/$2/$3/g" ${ENV_HOME}/.$1_auth |
사용자(로그인-ID)의 폰번호를 BaroPAM의 환경 설정 파일에서 변경하는 쉘 스크립트(setphone.sh) 실행 시 파라미터는 다음과 같다.
$1 : 로그인-ID
$2 : 변경전 폰번호
$3 : 변경후 폰번호
| [root]# sh setphone.sh nurit 01012341234 01027714076 |
4) 사용자(로그인-ID)의 비밀번호와 폰번호를 변경하는 쉘 스크립트 - chgpasswd.sh
| #!/bin/sh export LANG=C echo "$1:$2" | chpasswd sed -i "s/$3/$4/g" ${ENV_HOME}/.$1_auth |
사용자(로그인-ID)의 비밀번호와 BaroPAM의 환경 설정 파일에서 폰번호를 변경하는 쉘 스크립트(setpasswd.sh) 실행 시 파라미터는 다음과 같다.
$1 : 로그인-ID
$2 : 변경할 비밀번호
$3 : 변경전 폰번호
$4 : 변경후 폰번호
| [root]# sh chgpasswd.sh nurit !@Baropam# 01012341234 01027714076 |
5) 사용자(로그인-ID)를 삭제하는 쉘 스크립트 - deluser.sh
| #!/bin/sh export LANG=C ENV_HOME=/usr/baropam/openvpn; ACC_HOME=/home/$1 userdel –rf $1 \rm ${ENV_HOME}/.$1_auth |
사용자(로그인-ID)를 삭제하는 쉘 스크립트(deluser.sh) 실행 시 파라미터는 다음과 같다.
$1 : 삭제할 로그인-ID
| [root]# sh deluser.sh nurit |
5.3 OpenVPM 접속 테스트
OpenVPN 클라이언트 구성에서 사용자, 암호, 검증 코드를 묻는다. 사용자는 "baropam"이고 비밀번호는 위에서 임의로 생성되어 사용자에게 전송된 비밀번호와 검증코드에 BaroPAM 인증 코드를 추가하여 생성할 수 있는 인증 토큰이다. 따라서 암호가 "baropam"이고, BaroPAM 앱에서 생성한 인증 코드인 "183436"을 openvpn 프롬프트에 입력하면 된다.
모든 것이 올바르게 작동하면 다음과 같이 표시된다.
1) Linux 환경인 경우
| [root]# openvpn --config /home/baropam/baropam.ovpn Thu Dec 21 09:01:10 2023 Unrecognized option or missing or extra parameter(s) in /home/baropam/baropam.ovpn:18: block-outside-dns (2.4.12) Thu Dec 21 09:01:10 2023 OpenVPN 2.4.12 x86_64-redhat-linux-gnu [SSL (OpenSSL)] [LZO] [LZ4] [EPOLL] [PKCS11] [MH/PKTINFO] [AEAD] built on Nov 10 2023 Thu Dec 21 09:01:10 2023 library versions: OpenSSL 1.1.1k FIPS 25 Mar 2021, LZO 2.08 Enter Auth Username: baropam Enter Auth Password: ****** Thu Dec 21 09:01:35 2023 Outgoing Control Channel Encryption: Cipher 'AES-256-CTR' initialized with 256 bit key Thu Dec 21 09:01:35 2023 Outgoing Control Channel Encryption: Using 256 bit message hash 'SHA256' for HMAC authentication Thu Dec 21 09:01:35 2023 Incoming Control Channel Encryption: Cipher 'AES-256-CTR' initialized with 256 bit key Thu Dec 21 09:01:35 2023 Incoming Control Channel Encryption: Using 256 bit message hash 'SHA256' for HMAC authentication Thu Dec 21 09:01:35 2023 TCP/UDP: Preserving recently used remote address: [AF_INET]61.98.51.141:51194 Thu Dec 21 09:01:35 2023 Socket Buffers: R=[87380->87380] S=[16384->16384] Thu Dec 21 09:01:35 2023 Attempting to establish TCP connection with [AF_INET]61.98.51.141:51194 [nonblock] Thu Dec 21 09:01:36 2023 TCP connection established with [AF_INET]61.98.51.141:51194 Thu Dec 21 09:01:36 2023 TCP_CLIENT link local: (not bound) Thu Dec 21 09:01:36 2023 TCP_CLIENT link remote: [AF_INET]61.98.51.141:51194 Thu Dec 21 09:01:36 2023 TLS: Initial packet from [AF_INET]61.98.51.141:51194, sid=08897d04 ef24990c Thu Dec 21 09:01:36 2023 VERIFY OK: depth=1, CN=cn_PCzyQ4Y6veNJ1p4j Thu Dec 21 09:01:36 2023 VERIFY KU OK Thu Dec 21 09:01:36 2023 Validating certificate extended key usage Thu Dec 21 09:01:36 2023 ++ Certificate has EKU (str) TLS Web Server Authentication, expects TLS Web Server Authentication Thu Dec 21 09:01:36 2023 VERIFY EKU OK Thu Dec 21 09:01:36 2023 VERIFY X509NAME OK: CN=server_h84bYsnVsqSFo8h7 Thu Dec 21 09:01:36 2023 VERIFY OK: depth=0, CN=server_h84bYsnVsqSFo8h7 Thu Dec 21 09:01:36 2023 Control Channel: TLSv1.3, cipher TLSv1.3 TLS_AES_256_GCM_SHA384, 256 bit EC, curve: prime256v1 Thu Dec 21 09:01:36 2023 [server_h84bYsnVsqSFo8h7] Peer Connection Initiated with [AF_INET]61.98.51.141:51194 Thu Dec 21 09:01:37 2023 SENT CONTROL [server_h84bYsnVsqSFo8h7]: 'PUSH_REQUEST' (status=1) Thu Dec 21 09:01:37 2023 PUSH: Received control message: 'PUSH_REPLY,dhcp-option DNS 192.168.33.10,dhcp-option DNS 192.168.33.1,route 10.99.0.0 255.255.255.0,route 192.168.33.0 255.255.255.0,redirect-gateway def1 bypass-dhcp,route-gateway 10.99.0.1,topology subnet,ping 10,ping-restart 120,ifconfig 10.99.0.3 255.255.255.0,peer-id 0,cipher AES-128-GCM' Thu Dec 21 09:01:37 2023 OPTIONS IMPORT: timers and/or timeouts modified Thu Dec 21 09:01:37 2023 OPTIONS IMPORT: --ifconfig/up options modified Thu Dec 21 09:01:37 2023 OPTIONS IMPORT: route options modified Thu Dec 21 09:01:37 2023 OPTIONS IMPORT: route-related options modified Thu Dec 21 09:01:37 2023 OPTIONS IMPORT: --ip-win32 and/or --dhcp-option options modified Thu Dec 21 09:01:37 2023 OPTIONS IMPORT: peer-id set Thu Dec 21 09:01:37 2023 OPTIONS IMPORT: adjusting link_mtu to 1626 Thu Dec 21 09:01:37 2023 OPTIONS IMPORT: data channel crypto options modified Thu Dec 21 09:01:37 2023 Outgoing Data Channel: Cipher 'AES-128-GCM' initialized with 128 bit key Thu Dec 21 09:01:37 2023 Incoming Data Channel: Cipher 'AES-128-GCM' initialized with 128 bit key Thu Dec 21 09:01:37 2023 ROUTE_GATEWAY 192.168.33.1/255.255.255.0 IFACE=ens33 HWADDR=00:50:56:8b:88:28 Thu Dec 21 09:01:37 2023 TUN/TAP device tun1 opened Thu Dec 21 09:01:37 2023 TUN/TAP TX queue length set to 100 Thu Dec 21 09:01:37 2023 /sbin/ip link set dev tun1 up mtu 1500 Thu Dec 21 09:01:37 2023 /sbin/ip addr add dev tun1 10.99.0.3/24 broadcast 10.99.0.255 Thu Dec 21 09:01:37 2023 /sbin/ip route add 61.98.51.141/32 via 192.168.33.1 Thu Dec 21 09:01:37 2023 /sbin/ip route add 0.0.0.0/1 via 10.99.0.1 |
2) Windows 환경인 경우
Windows 환경인 경우 OpenVPN를 설치한 후 신규 사용자 생성 시 생성된 Openvpn client connect를 이용하여 접속시 필요한 profile인 "Client name.ovpn" 파일을 OpenVPN GUI에 Import 시킨 다음 로그인 테스트를 진행해야 한다.
6. BaroPAM 적용
6.1 BaroPAM 적용 프로세스
OpenVPN의 로그인 화면에서 Verification code의 "요청값"란에 "BaroPAM" 앱에서 생성한 일회용 인증키를 입력하기 위한 적용 절차는 다음과 같다 .

6.2 BaroPAM 적용 화면
OpenVPN의 로그인 화면에서 Verification code의 "요청값"란에 "BaroPAM" 앱에서 생성한 일회용 인증키를 입력하기 위한 적용 절차는 다음과 같다.

6.3 본인확인 적용 프로세스
아이폰(iPhone)의 기기정보를 얻지 못해서 2차 인증키(일회용 인증키)를 생성하기 위해서 로그인 정보 항목을 선택 했을 때 "일회용 인증키" 생성 화면으로 이동하지 않은 경우가 발생할 수 있다.
또한, 타인의 폰번호를 부정으로 사용하지 못하도록 하기 위해서 별도의 본인확인 기능을 적용할 필요가 있는데, "BaroPAM" 앱에서는 자체 알고리즘을 적용하여 자체적으로 본인확인 절차를 실행하고 있다.

6.4 본인확인 적용 화면
아이폰(iPhone)의 기기정보를 얻지 못해서 2차 인증키(일회용 인증키)를 생성하기 위해서 로그인 정보 항목을 선택 했을 때 "일회용 인증키" 생성 화면으로 이동하지 않은 경우가 발생할 수 있다.
또한, 타인의 폰번호를 부정으로 사용하지 못하도록 하기 위해서 별도의 본인확인 기능을 적용할 필요가 있는데, "BaroPAM" 앱에서는 자체 알고리즘을 적용하여 자체적으로 본인확인 절차를 실행하고 있다.

참고) SMS로 전송한 OTA key가 수신은 되었는데 키판 위에 표시되지 않거나 SMS로 전송한 OTA key가 수신되지 않은 경우

아이폰의 "암호 자동 완성 기능"이 설정되지 않아서 발생한다. "BaroPAM" 앱을 설치한 후 iOS12 부터는 더욱 편리한 암호 자동 완성 기능을 반드시 설정해야 한다. (아이폰의 "설정" -> "암호" -> "암호 자동 완성" -> "허용")
6.5 OpenVPN 로그인
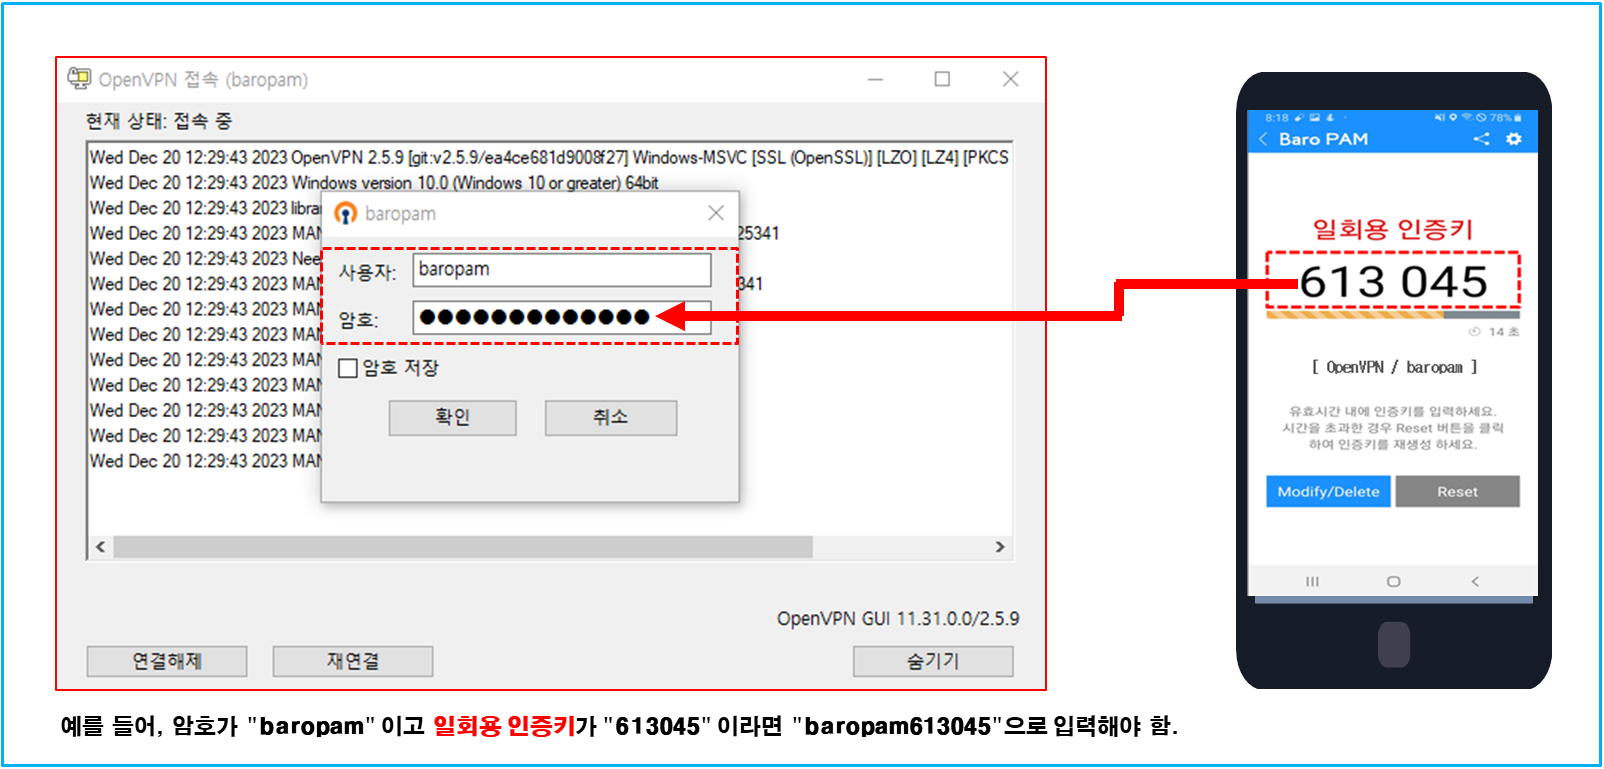
OpenVPN의 보안 강화를 위하여 로그인 화면에서 "사용자"를 입력하고, 암호가 "baropam"이고, BaroPAM 앱에서 생성한 인증 코드인 "613045"이라면 비밀번호 프롬프트에 "baropam613045"을 입력한 후 하단의 "확인" 버튼을 클릭한다.

7. About BaroPAM

Version 1.0 - Official Release - 2016.12.1
Copyright ⓒ Nurit corp. All rights reserved.
제 조 사 : 주식회사 누리아이티
등록번호 : 258-87-00901
대표이사 : 이종일
대표전화 : 02-2665-0119(영업문의/기술지원)
이 메 일 : mc529@nurit.co.kr
주 소 : 서울시 강서구 마곡중앙2로 15, 913호(마곡동, 마곡테크노타워2)
'▶ BaroSolution > 가이드' 카테고리의 다른 글
| BaroPAM integration Guide(Tomcat console) (0) | 2023.08.18 |
|---|---|
| Tomcat 콘솔에서 사용자 식별 및 인증을 위한 다계층 인증 솔루션인 BaroPAM 솔루션의 적용 가이드 (0) | 2023.08.17 |
| BaroPAM installation Guide (Windows) (0) | 2023.08.03 |
| BaroPAM Solution installation summary (Windows) (0) | 2023.08.02 |
| NTP(Network Time Protocol) 설정 가이드 (0) | 2023.07.29 |