
Application guide of BaroPAM solution, a multi-layer authentication solution for user identification and authentication in OpenVPN environment
Index
1. What is OpenVPN?
2. OpenVPN installation and setup
2.1 Install OpenVPN
2.2 Linux client configuration
3. BaroPAM installation and setup
3.1 Preparation before installing BaroPAM
3.2 Download BaroPAM installation module
3.3 Create BaroPAM configuration file
3.4 BaroPAM exclusive allow policy settings
3.5 NTP(Network Time Protocol) settings
4. OpenVPN server and BaroPAM configuration
4.1 OpenVPN and FreeRADIUS integration
4.2 OpenVPN server configuration
4.3 BaroPAM Configuration
5. OpenVPN connection test
5.1 Create new user
5.2 Create BaroPAM configuration file
5.3 OpenVPM connection test
6. BaroPAM application
6.1 BaroPAM application process
6.2 BaroPAM application screen
6.3 Identity verification application process
6.4 Identity verification application screen
6.5 OpenVPN Login
7. About BaroPAM
1. What is OpenVPN?
A virtual private network (VPN) connects point to point using a tunneling protocol (communication protocol) based on encryption technology without a separate dedicated private network. This means a network solution that can build a wide area network (WAN) at low cost.
OpenVPN refers to an open source VPN protocol and its access program developed and distributed by OpenVPN Technologies, Inc.
As an open-source VPN protocol that can use both TCP and UDP protocols, it establishes a VPN connection using a TAP or TUN virtual network adapter.
Since packets are encrypted using SSL or TLS, a valid CA certificate is required. However, this is because there is no problem with the connection even if you do not use a trusted CA. In response, many individual users use programs such as OpenSSL to create VPN servers using self-authenticated certificates.
Even where L2TP or PPTP is blocked, OpenVPN is likely to connect.
However, if the firewall is an application firewall that intercepts all packets, there is no answer. In particular, in China and Egypt, which are active in Internet censorship, it was already blocked in 2013. To use OVPN in such an environment, it is necessary to set the cipher to AES-256-CFB, wrap it with an SSL or SSH tunnel (stunnel, etc.), use an XOR patch, or have a camouflage such as Obfsproxy.
Used when building an OpenVPN server or connecting to a server. It operates by reading the OpenVPN configuration file with the extension ovpn. The configuration file is different for the server and client, but the extension is the same, which can be confusing.
The client can read the certificate itself, so it works without installing a separate certificate.
There are two types of OpenVPN servers: OpenVPN Community Edition, which is free/open source (GPL), and paid OpenVPN Access Server, which provides additional features such as web GUI.
OpenVPN Community Edition basically does not provide a separate GUI for configuration, so you need to build a server using only command lines and text files. However, you can find any number of configuration methods on the Internet, and in some cases, a third-party wrapper is created, such as a router with custom firmware such as DD-WRT, so that you can build a server on the GUI.
Meanwhile, the OpenVPN client is available for Android (4.0 and above) and iOS, and supports most desktop operating systems. However, among modern mobile operating systems, Windows Phone (7, 8, and 10 all), Blackberry OS 10, and Tizen cannot be used. Sailfish OS supports it as a third-party app.

2. OpenVPN installation and setup
2.1 Install OpenVPN
Configuring OpenVPN on a CentOS 7/8 environment is surprisingly "easier than expected". First you need OpenVPN and easy-rsa.
1. Select the EPEL repository and then install the package
It comes with all the dependencies needed to install the OpenVPN package.
| [root]# yum -y install epel-release |
2. Find your server's public IP address
It is important to find out the server's public IP address, as it will come in handy when setting up an OpenVPN server.
| [root]# curl ifconfig.me 173.82.115.6 |
3. Download the OpenVPN installation script and run the indicated commands.
| [root]# wget https://raw.githubusercontent.com/Angristan/openvpn-install/master/openvpn-install.sh |
4. Set execute permission to OpenVPN installation script
| [root]# chmod +x openvpn-install.sh |
5. Run the OpenVPN installation script
| [root]# ./openvpn-install.sh |
6. You will first be asked to provide the server's public IP address. After that, it is recommended to use the default options such as the default port number (1194) and the protocol to be used (UDP/TCP).

7. Next, select the default DNS resolver and select the no (n) option for both compression and encryption settings.

8. Upon completion, the script initializes the OpenVPN server's settings along with the installation of other software packages and dependencies.

9. Finally, create a client configuration file using the easy-RSA package, a command-line tool used for managing security certificates.
Just enter the client name and use the default selection. Client files are stored in your home directory with the .ovpn file extension.

10. When the script sets up the OpenVPN server and creates the client configuration file, the tunnel interface tun0 is created. This is a virtual interface through which all traffic from the client PC is tunneled to the server.

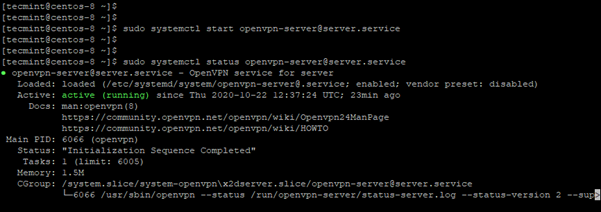
11. Start OpenVPN server and check status
2.2 Linux client configuration
1. Install EPEL repository and OpenVPN software package
| $ sudo yum -y install epel-release $ sudo yum –y install openvpn |
2. Once installed, use the scp command to test if it works
| $ sudo scp -r tecmint@173.82.115.6:/home/tecmint/tecmint01.ovpn . |

3. Once the client files are downloaded to your Linux machine, you can now initiate a connection to the VPN server using the following command.
| $ sudo openvpn --config tecmint01.ovpn |
You should get output similar to the one below.

4. A new routing table is created and a connection with the VPN server is established. Again, the virtual interface tunnel interface tun0 is created on the client machine.
As mentioned earlier, this is an interface that securely tunnels all traffic through an SSL tunnel to the OpenVPN server. The interface is dynamically assigned an IP address by the VPN server. As you can see, the OpenVPN server assigned an IP address of 10.8.0.2 to the client Linux system.
| $ ifconfig |

5. Check your public IP to see if you are connected to the OpenVPN server
| $ curl ifconfig.me |

I verified that the client machine was actually connecting to the OpenVPN server by selecting the VPN's public IP. Alternatively, you can fire up your browser and run a Google search "What's my IP" to see if your public IP has changed to the IP of your OpenVPN server.

Note) In OpenVPN, two methods of interworking with BaroPAM as secondary authentication support PAM authentication and Radius authentication. This document deals with PAM authentication, and for Radius authentication, refer to the "BaroPAM Guide (RADIUS-en).doc" document.
3. BaroPAM installation and setup

3.1 Preparation before installing BaroPAM
To use the PAM module, the PAM package must be installed by default. To check the installation, run the following command. If it is not installed, use the command "dnf install pam" for Redhat series and "sudo apt-get install pam" for others.
| [root]# rpm -qa | grep pam pam_smb-1.1.7-7.2.1 pam_passwdqc-1.0.2-1.2.2 pam-0.99.6.2-14.el5_11 pam_krb5-2.2.14-22.el5 pam-devel-0.99.6.2-14.el5_11 pam_ccreds-3-5 pam_smb-1.1.7-7.2.1 pam_pkcs11-0.5.3-26.el5 pam-devel-0.99.6.2-14.el5_11 pam_passwdqc-1.0.2-1.2.2 pam-0.99.6.2-14.el5_11 pam_ccreds-3-5 pam_krb5-2.2.14-22.el5 pam_pkcs11-0.5.3-26.el5 |
To download and install the BaroPAM authentication module, connect with the root account and create a directory (/usr/baropam) to download and install the module as follows.
| [root]# mkdir /usr/baropam |
Grant permissions (read, write, execute) of the directory to download and install the BaroPAM module as follows.
| [root]# chmod 777 /usr/baropam |
3.2 Download BaroPAM installation module
After accessing the BaroPAM authentication module with the root account, move to the directory (/usr/baropam) to download and install the module, and download the module as follows.
| [root] /usr/baropam > wget http://nuriapp.com/download/libpam_baro_auth-x.x.tar |
When the download of the BaroPAM authentication module is complete, the tar file is decompressed as follows.
| [root] /usr/baropam > tar -xvf libpam_baro_auth-x.x.tar |
When the BaroPAM authentication module is unzipped, the following BaroPAM related modules are created in the baropam directory.
| [root] /usr/baropam > ls -al 합계 180 drwxrwxrwx 7 root root 4096 8월 23 09:59 . drwxr-xr-x 17 root root 4096 2월 10 2017 .. -r--r--r-- 1 root root 8 3월 24 2021 .baro_acl -r--r--r-- 1 root root 305 7월 2 14:41 .baro_auth -r--r--r-- 1 root root 290 6월 30 12:55 .baro_curl -rwxr-xr-x 1 root root 69149 4월 6 19:12 baro_auth -rwxr-xr-x 1 root root 65072 6월 29 16:36 baro_curl drwxr-xr-x 2 root root 4096 7월 20 2021 jilee -rwxr-xr-x 1 root root 152649 6월 9 08:19 pam_baro_auth.so -rwxr-xr-x 1 root root 116158 6월 30 12:54 pam_baro_curl.so -rw-r--r-- 1 root root 150 6월 29 16:29 setcurl.sh -rw-r--r-- 1 root root 221 6월 27 15:59 setenv.sh |
3.3 Create BaroPAM configuration file
The BaroPAM environment setting file must be created by executing the baro_auth program, and it must be located under /usr/baropam, the directory of the BaroPAM authentication module.
Format)
| baro_auth -r rate_limit -R rate_time -t cycle_time –k key_method –e encrypt_flag -A acl_type -a acl_filename -S secure_key -s filename |
The configuration options of the BaroPAM configuration file are as follows.
| Optino | Decumentation | Set value | Etc |
| -r | OTA key limited number of times (1~10) | 3 | |
| -R | OTA key time limit (15~600 sec) | 30 | |
| -t | OTA key authentication cycle (3~60 sec) | 30 | |
| -k | OTA key authentication method (app1, app256, app384, app512) | app512 | |
| -e | Encryption of configuration files (yes or no) | no | |
| -A | Choose whether to allow or deny 2nd authentication | deny | |
| -a | ACL file name for the account to allow or deny from 2nd authentication (file access permission is 444) | /usr/baropam/.baro_acl | |
| -S | Secure key (license key) provided by the vendor | jIqIcHbVqdpj7b4PzBpM2DiIeBvmHFV/ | |
| -s | File name including the directory in which to create the BaroPAM configuration file | /usr/baropam/.baro_auth |
Note) The filename of the -s option is the name of the file including the directory where the BaroPAM configuration file will be created (file access permission is 444).
Ex of use)
| [root] /usr/baropam > ./baro_auth -r 3 -R 30 -t 30 –k app512 –e no -A deny -a /usr/baropam/.baro_acl -S jIqIcHbVqdpj7b4PzBpM2DiIeBvmHFV/ -s /usr/baropam/.baro_auth |
If the BaroPAM environment setting file is set for each account, connect to the account and proceed with the work. (Not root)
| [root] /usr/baropam > ./baro_auth -r 3 -R 30 -t 30 –k app512 –e no -A deny -a ~/.baro_acl -S jIqIcHbVqdpj7b4PzBpM2DiIeBvmHFV/ -s ~/.baro_auth |
1) Your emergency one-time authentication keys are:
The emergency OTA key is a super authentication key that can be used to access the SSH server again in case you lose it when the OTA key generator, the BaroPAM app, is unavailable, so it is good to write it down somewhere.
2) Enter "y" for all the questions that follow.
Do you want me to update your "/usr/baropam/.baro_auth" file (y/n) y
Preventing man-in-the-middle attacks (y/n) y
The contents set in .baro_auth, the BaroPAM environment setting file, are as follows.
| [root] /usr/baropam > cat .baro_auth " AUTH_KEY " RATE_LIMIT 3 30 " KEY_METHOD app512 " CYCLE_TIME 30 " SECURE_KEY jIqIcHbVqdpj7b4PzBpM2DiIeBvmHFV/ " ACL_NAME /usr/baropam/.baro_acl " ACL_TYPE deny " DISALLOW_REUSE 33458936 19035576 15364353 54649370 84342192 |
The setting items of .baro_auth, a BaroPAM configuration file, are as follows.
| Item | Decumentation | Set value | Etc |
| AUTH_KEY | Authentication delimiter (fixed) | ||
| RATE_LIMIT | OTA key limit count (1~10), time limit (15~600 sec) | 3 30 | |
| KEY_METHOD | OTA key authentication method (app1, app256, app384, app512 | app512 | |
| CYCLE_TIME | OTA key authentication cycle (3~60 sec) | 30 | |
| SECURE_KEY | Secure key (license key) provided by the vendor | jIqIcHbVqdpj7b4PzBpM2DiIeBvmHFV/ | |
| ACL_TYPE | Differentiate between allow and deny in 2nd authentication | deny | |
| ACL_NAME | ACL Filename for the account to be allowed or excluded from 2nd authentication (file access permission is 444) | /usr/baropam/.baro_acl | |
| DISALLOW_REUSE or ALLOW_REUSE |
To prevent a man-in-the-middle attack, if "DISALLOW_REUSE" is set, other users cannot log in during the authentication cycle of the OTA key. If allowed, set "ALLOW_REUSE". | DISALLOW_REUSE |
When using the BaroPAM module, if you need to exclude from the ACL for the account to be excluded from secondary authentication, create an ACL file in the directory set when setting up the BaroPAM environment, and enter the account to be excluded as follows. (The file access permission for .baro_acl must be set to 444.)
| [root] /usr/baropam > vi .baro_acl barokey baropam |
3.4 BaroPAM exclusive allow policy settings
SELinux (Security-Enhanced Linux) is a kernel security module that implements MAC(Mandatory Access Control) to enhance the security of Linux systems.
To use a simple analogy, if traditional Linux permissions operate on the principle that "users with permissions can access all accounts," SELinux acts as a "strict overseer" that restricts access to only specific modules (or files) belonging to specific authorized accounts, even if one has the necessary permissions.
① Key Roles and Features
First, implementation of MAC(Mandatory Access Control)
The existing traditional Linux DAC(Discretionary Access Control) had a weakness in that file owners could arbitrarily grant permissions (such as 777), allowing the entire system to be taken over if a hacker seized root privileges.
A distinguishing feature of SELinux is that security policies set by the system administrator take precedence. Even if a file has 777 permissions, processes not allowed by the policy cannot access it.
Second, Principle of Least Privilege
Grant only the permissions absolutely necessary for the process to operate.
Ex) The web server (Apache) process can only read the web content directory (httpd_sys_content_t) and is blocked from accessing user home directories or system configuration files.
Third, security context-based management
Manage all files, processes, and network ports by attaching "labels".
Format) User:Role:Type:Level
Among these, "Type" is the most critical element, and access is allowed only if the process type and file type match. (This is called Type Enforcement)
② Why you need it
Let's assume a hacker infiltrates the system by exploiting a vulnerability in the web server. In the absence of SELinux, the hacker could steal /etc/shadow (password file) or tamper with the authentication module through the web server (root privileges).
When SELinux is present, if the web server process attempts to access /etc/shadow, SELinux immediately blocks it, stating, "The web server type does not have permission to read the system password type." There are no exceptions, even for root privileges.
③ How to set up
Previously, when configuring the BaroPAM environment on Red Hat-based systems, the entry "SELINUX=disabled" in the "/etc/sysconfig/selinux" file was changed; however, going forward, you should proceed in the following order without modifying the "/etc/sysconfig/selinux" file.
First, remove permissions for the /usr/baropam directory
| [root@baropam baropam]# chattr -i /usr/baropam |
Second, change SELinux to Permissive mode (for log collection)
| [root@baropam baropam]# setenforce 0 [root@baropam baropam]# getenforce Permissive |
Third, BaroPAM test (sshd, su, sudo, login, gdm-password, etc.)
Configuration modules pam_baro_auth.so (default), pam_baro_sql.so (if using the web console)
Fourth, install the audit2allow tool
| CentOS 8 / Rocky Linux / RHEL 8 or higher: [root@baropam baropam]# dnf -y install policycoreutils-python-utils CentOS 7 or lower: [root@baropam baropam]# yum -y install policycoreutils-python Ubuntu / Debian: If you are using Selinux [root@baropam baropam]# apt -y install policycoreutils Check installation [root@baropam baropam]# audit2allow --version audit2allow .1 |
Fifth, check the policy file location
| [root@baropam baropam]# ls /etc/selinux/targeted/policy/ policy.33 |
Sixth, find denied entries and create a BaroPAM-exclusive allow policy
| [root@baropam baropam]# grep "denied" /var/log/audit/audit.log | audit2allow -M baropam_policy -p /etc/selinux/targeted/policy/policy.33 ******************** serious *********************** To activate this policy package, do the following: semodule -i baropam_policy.pp |
Seventh, register the generated policy module
| [root@baropam baropam]# semodule -i baropam_policy.pp |
Eighth, declare the /usr/baropam directory as an 'authentication data only' zone
| [root@baropam baropam]# semanage fcontext -a -t auth_cache_t "/usr/baropam(/.*)?" File context for /usr/baropam(/.*)? already defined, modifying instead |
Ninth, apply to actual files
| [root@baropam baropam]# restorecon -Rv /usr/baropam |
Tenth, change SELinux to Enforcing mode
| [root@baropam baropam]# setenforce 1 [root@baropam baropam]# getenforce Enforcing |
Eleventh, BaroPAM test (sshd, su, sudo, login, gdm-password, etc.)
3.5 NTP(Network Time Protocol) settings
Since BaroPAM is a time synchronization method, if the server's time is different from the current time, login to the server may not be possible because the OTA keys do not match.
Recently, as a method of time synchronization (time server time synchronization) for information assets, the system time can be set to the current time in the root account using NTP (Network Time Protocol).
To use NTP, the NTP package must be installed by default. To check the installation, run the following command. If it is not installed, use the command "yum install ntp" for Redhat, CentOS 8 or lower, and "sudo apt-get install ntp" for others.
| [root]# rpm -qa | grep ntp ntp-4.2.2p1-18.el5.centos chkfontpath-1.10.1-1.1 |
The following command can be used to register the ntpd service in the startup program when booting the server and to check whether ntp is activated.
| [root]# chkconfig ntpd on [root]# chkconfig --list | grep ntp ntpd 0:off 1:off 2:on 3:on 4:on 5:on 6:off |
Check whether the ntpd daemon is active when booting the server using chkconfig. If it is off in level 3 and 5, it is not activated automatically. To activate automatically, you must change 3 and 5 to on (active) with the following command.
| [root]# chkconfig --level 3 ntpd on [root]# chkconfig --level 5 ntpd on |
NTP servers operating in Korea are as follows.
| server kr.pool.ntp.org server time.bora.net |
Set the NTP server operating in Korea in "/etc/ntp.conf", the configuration file for the ntpd daemon configuration, as follows.
| [root]# vi /etc/ntp.conf # Use public servers from the pool.ntp.org project. # Please consider joining the pool (http://www.pool.ntp.org/join.html). #server 0.centos.pool.ntp.org #server 1.centos.pool.ntp.org #server 2.centos.pool.ntp.org #server 3.centos.pool.ntp.org server kr.pool.ntp.org iburst minpoll 7 maxpoll 10 server time.bora.net iburst minpoll 7 maxpoll 10 |
The iburst option is a kind of option setting that shortens the time required for synchronization.
The minpoll and maxpoll options are options that set the minimum and maximum intervals for requesting time information from the NTP server (Polling Interval) in the NTP settings
These values are not times in seconds, but exponential values calculated as powers of 2.
Actual polling interval (seconds) = 2set value
The minpoll (minimum polling interval) option specifies the shortest minimum interval at which an NTP client requests time information from an NTP server.
The default is usually set to 6, which means 26 = 64 seconds, meaning one request every 64 seconds.
The setting range is generally set from 3 (8 seconds), and the allowable range may vary depending on the environment.
The maxpoll (maximum polling interval) option specifies the longest maximum interval at which an NTP client requests time information from an NTP server.
The default is usually set to 10. 210 = 1024 seconds, meaning one request every 1024 seconds.
The setting range is generally set to 17 (approximately 36.4 hours), but the allowable range may vary depending on the environment.
As the system clock accuracy improves, NTP gradually increases the polling interval (toward the maxpoll value) to reduce network traffic. Conversely, as the clock error increases or becomes unstable, NTP shortens the polling interval (toward the minpoll value) to quickly restore synchronization. These two values are crucial factors in determining the flexibility and efficiency of NTP synchronization.
After the setup for the ntpd daemon setup is complete, it is absolutely necessary to restart the NTP daemon after confirming that the NTP setup has been properly added.
| [root]# /etc/init.d/ntpd restart Stopping ntpd: [ OK ] Starting ntpd: [ OK ] |
You can check the ntpd time with the following command.
| [root]# ntpq -p remote refid st t when poll reach delay offset jitter ============================================================================== *121.174.142.82 220.73.142.66 3 u 791 1024 377 9.333 -4.250 0.428 +time.bora.net 58.224.35.2 3 u 654 1024 367 2.926 -27.295 24.481 183.110.225.61 .INIT. 16 u - 1024 0 0.000 0.000 0.000 LOCAL(0) .LOCL. 10 l 39 64 377 0.000 0.000 0.001 |
* The displayed ip is the ntp server getting the current time
To use NTP, the NTP package must be installed by default. To check the installation, run the following command. If it is not installed, use the "dnf install chrony" command to install Redhat, CentOS 8 or later versions.
| [root@baropam ~]# rpm -qa | grep chrony chrony-3.5-1.el8.x86_64 |
NTP servers operating in Korea are as follows.
| server kr.pool.ntp.org server time.bora.net |
Set the NTP server operating in Korea in "/etc/chrony.conf", the configuration file for the ntpd daemon configuration, as follows.
| [root@baropam ~]# vi /etc/chrony.conf # Use public servers from the pool.ntp.org project. # Please consider joining the pool (http://www.pool.ntp.org/join.html). #pool 2.centos.pool.ntp.org iburst server kr.pool.ntp.org iburst minpoll 7 maxpoll 10 server time.bora.net iburst minpoll 7 maxpoll 10 # Record the rate at which the system clock gains/losses time. driftfile /var/lib/chrony/drift # Allow the system clock to be stepped in the first three updates # if its offset is larger than 1 second. makestep 1.0 3 # Enable kernel synchronization of the real-time clock (RTC). rtcsync # Enable hardware timestamping on all interfaces that support it. #hwtimestamp * # Increase the minimum number of selectable sources required to adjust # the system clock. #minsources 2 # Allow NTP client access from local network. allow 192.168.0.0/16 # Serve time even if not synchronized to a time source. #local stratum 10 # Specify file containing keys for NTP authentication. keyfile /etc/chrony.keys # Get TAI-UTC offset and leap seconds from the system tz database. leapsectz right/UTC # Specify directory for log files. logdir /var/log/chrony # Select which information is logged. #log measurements statistics tracking |
After the setup for the ntpd daemon setup is complete, it is absolutely necessary to restart the NTP daemon after confirming that the NTP setup has been properly added. (Starting chrony service and registering drive when booting)
| [root@baropam ~]# sudo systemctl enable chronyd [root@baropam ~]# sudo systemctl restart chronyd |
You can check the ntpd time with the following command.
List of servers receiving time / list of servers registered in chrony.conf file)
| [root@baropam ~]# chronyc sources 210 Number of sources = 2 MS Name/IP address Stratum Poll Reach LastRx Last sample =============================================================================== ^* ec2-54-180-134-81.ap-nor> 2 6 377 43 -349us[-1059us] +/- 24ms ^- time.bora.net 2 6 377 42 +1398us[+1398us] +/- 90ms |
Server information receiving time)
| [root@baropam ~]# chronyc tracking Reference ID : 36B48651 (ec2-54-180-134-81.ap-northeast-2.compute.amazonaw) Stratum : 3 Ref time (UTC) : Sun Mar 22 07:07:43 2020 System time : 0.000130027 seconds slow of NTP time Last offset : -0.000710122 seconds RMS offset : 0.000583203 seconds Frequency : 19.980 ppm fast Residual freq : +0.142 ppm Skew : 3.235 ppm Root delay : 0.013462566 seconds Root dispersion : 0.017946836 seconds Update interval : 65.0 seconds Leap status : Normal |
Check information such as time status and synchronization)
| [root@baropam ~]# timedatectl status Local time: Sun 2020-03-22 16:08:45 KST Universal time: Sun 2020-03-22 07:08:45 UTC RTC time: Sun 2020-03-22 07:08:44 Time zone: Asia/Seoul (KST, +0900) System clock synchronized: yes NTP service: active RTC in local TZ: no |
4. OpenVPN server and BaroPAM configuration
There are two ways to configure OpenVPN server and BaroPAM:
First, link with PAM of OpenVPN server
Second, link with OpenVPN and FreeRADIUS
4.1 OpenVPN and FreeRADIUS integration
OpenVPN and FreeRADIUS integration requires installing a plug-in module to replace the existing PAM authentication by installing "radiusplugin_v2.1a_beta1d". (For RADIUS related information, see "BaroPAM Guide (RADIUS)")
| [root]# cd /usr/local/src/ [root]# wget http://www.nongnu.org/radiusplugin/radiusplugin_v2.1a_beta1.tar.gz [root]# yum install libgcrypt* [root]# tar xvzf radiusplugin_v2.1a_beta1.tar.gz [root]# cd radiusplugin_v2.1a_beta1/ [root]# yum -y install gcc [root]# yum -y install gcc-c++ [root]# make [root]# cp radiusplugin.cnf /etc/openvpn/ [root]# cp radiusplugin.so /etc/openvpn/ [root]# cd /etc/openvpn |
In the plug-in module's configuration file, "radiusplugin.cnf", the server address and sharedsecret set when configuring the RADIUS server configuration must be set the same.
| [root]# vi /etc/openvpn/radiusplugin.cnf # The NAS identifier which is sent to the RADIUS server NAS-Identifier=OpenVpn # The service type which is sent to the RADIUS server Service-Type=5 # The framed protocol which is sent to the RADIUS server Framed-Protocol=1 # The NAS port type which is sent to the RADIUS server NAS-Port-Type=5 # The NAS IP address which is sent to the RADIUS server NAS-IP-Address=127.0.0.1 # Path to the OpenVPN configfile. The plugin searches there for # client-config-dir PATH (searches for the path) # status FILE (searches for the file, version must be 1) # client-cert-not-required (if the option is used or not) # username-as-common-name (if the option is used or not) OpenVPNConfig=/etc/openvpn/server.conf # Support for topology option in OpenVPN 2.1 # If you don't specify anything, option "net30" (default in OpenVPN) is used. # You can only use one of the options at the same time. # If you use topology option "subnet", fill in the right netmask, e.g. from OpenVPN option "--server NETWORK NETMASK" subnet=255.255.255.0 # If you use topology option "p2p", fill in the right network, e.g. from OpenVPN option "--server NETWORK NETMASK" # p2p=10.8.0.1 # Allows the plugin to overwrite the client config in client config file directory, # default is true overwriteccfiles=true # Allows the plugin to use auth control files if OpenVPN (>= 2.1 rc8) provides them. # default is false # useauthcontrolfile=false # Only the accouting functionality is used, if no user name to forwarded to the plugin, the common name of certificate is used # as user name for radius accounting. # default is false # accountingonly=false # If the accounting is non essential, nonfatalaccounting can be set to true. # If set to true all errors during the accounting procedure are ignored, which can be # - radius accounting can fail # - FramedRouted (if configured) maybe not configured correctly # - errors during vendor specific attributes script execution are ignored # But if set to true the performance is increased because OpenVPN does not block during the accounting procedure. # default is false nonfatalaccounting=false # Path to a script for vendor specific attributes. # Leave it out if you don't use an own script. # vsascript=/root/workspace/radiusplugin_v2.0.5_beta/vsascript.pl # Path to the pipe for communication with the vsascript. # Leave it out if you don't use an own script. # vsanamedpipe=/tmp/vsapipe # A radius server definition, there could be more than one. # The priority of the server depends on the order in this file. The first one has the highest priority. server { # The UDP port for radius accounting. acctport=1813 # The UDP port for radius authentication. authport=1812 # The name or ip address of the radius server. # name=192.168.0.153 name=127.0.0.1 # How many times should the plugin send the if there is no response? retry=1 # How long should the plugin wait for a response? wait=1 # The shared secret. sharedsecret=baropam } |
4.2 OpenVPN server configuration
This is a standard OpenVPN server configuration, except that OpenVPN adds a module plugin directive after the existing configuration annotation so that it can be logged in with the RADIUS module in the existing PAM authentication method.
| [root]# vi /etc/openvpn/server.conf port 51194 proto tcp dev tun user nobody group nobody persist-key persist-tun keepalive 10 120 topology subnet server 10.99.0.0 255.255.255.0 ifconfig-pool-persist ipp.txt push "dhcp-option DNS 192.168.33.10" push "dhcp-option DNS 192.168.33.1" push "route 10.99.0.0 255.255.255.0" push "route 192.168.33.0 255.255.255.0" push "redirect-gateway def1 bypass-dhcp" dh none ecdh-curve prime256v1 tls-crypt tls-crypt.key crl-verify crl.pem ca ca.crt cert server_h84bYsnVsqSFo8h7.crt key server_h84bYsnVsqSFo8h7.key auth SHA256 cipher AES-128-GCM ncp-ciphers AES-128-GCM tls-server tls-version-min 1.2 tls-cipher TLS-ECDHE-ECDSA-WITH-AES-128-GCM-SHA256 client-config-dir /etc/openvpn/ccd status /var/log/openvpn/status.log verb 3 #PAM username-as-common-name auth-nocache #plugin /usr/lib64/openvpn/plugins/openvpn-plugin-auth-pam.so login #plugin /usr/lib64/openvpn/plugins/openvpn-plugin-auth-pam.so "openvpn login USERNAME password PASSWORD pin OTP" plugin /etc/openvpn/radiusplugin.so /etc/openvpn/radiusplugin.cnf |
This configuration creates an openvpn server on TCP port 51194. The default is to use UDP, but I've found that TCP works better on unreliable networks.
Note)
| [root@vpntest ~]# ifconfig ens33: flags=4163<UP,BROADCAST,RUNNING,MULTICAST> mtu 1500 inet 192.168.33.50 netmask 255.255.255.0 broadcast 192.168.33.255 inet6 fe80::250:56ff:fe8b:8828 prefixlen 64 scopeid 0x20<link> ether 00:50:56:8b:88:28 txqueuelen 1000 (Ethernet) RX packets 2144 bytes 221198 (216.0 KiB) RX errors 0 dropped 0 overruns 0 frame 0 TX packets 1118 bytes 640315 (625.3 KiB) TX errors 0 dropped 0 overruns 0 carrier 0 collisions 0 lo: flags=73<UP,LOOPBACK,RUNNING> mtu 65536 inet 127.0.0.1 netmask 255.0.0.0 inet6 ::1 prefixlen 128 scopeid 0x10<host> loop txqueuelen 1000 (Local Loopback) RX packets 6 bytes 651 (651.0 B) RX errors 0 dropped 0 overruns 0 frame 0 TX packets 6 bytes 651 (651.0 B) TX errors 0 dropped 0 overruns 0 carrier 0 collisions 0 tun0: flags=4305<UP,POINTOPOINT,RUNNING,NOARP,MULTICAST> mtu 1500 inet 10.99.0.1 netmask 255.255.255.0 destination 10.99.0.1 inet6 fe80::4747:2667:f522:c8bb prefixlen 64 scopeid 0x20<link> unspec 00-00-00-00-00-00-00-00-00-00-00-00-00-00-00-00 txqueuelen 100 (UNSPEC) RX packets 30 bytes 3735 (3.6 KiB) RX errors 0 dropped 0 overruns 0 frame 0 TX packets 38 bytes 7539 (7.3 KiB) TX errors 0 dropped 0 overruns 0 carrier 0 collisions 0 virbr0: flags=4099<UP,BROADCAST,MULTICAST> mtu 1500 inet 192.168.122.1 netmask 255.255.255.0 broadcast 192.168.122.255 ether 52:54:00:1e:bf:88 txqueuelen 1000 (Ethernet) RX packets 0 bytes 0 (0.0 B) RX errors 0 dropped 0 overruns 0 frame 0 TX packets 0 bytes 0 (0.0 B) TX errors 0 dropped 0 overruns 0 carrier 0 collisions 0 |
4.3 BaroPAM Configuration
Due to the nature of OpenVPN, in order to set BaroPAM environment configuration files for each user account, a directory dedicated to BaroPAM environment configuration files (/usr/baropam/openvpn) is created as follows.
| [root]# mkdir /usr/baropam/openvpn |
Grant permissions (read, write) to the directory dedicated to the BaroPAM environment configuration file (/usr/baropam/openvpn) as follows.
| [root]# chmod -R 755 /usr/baropam/openvpn |
1) For OpenVPN server PAM integration
Due to the nature of OpenVPN, when setting up a separate BaroPAM configuration file for each user account, the setting method for setting the BaroPAM module in the /etc/pam.d/login file is entered at the top as follows.
| [root] /usr/baropam > vi /etc/pam.d/login #%PAM-1.0 auth required /usr/baropam/pam_baro_auth.so forward_pass secret=/usr/baropam/openvpn/.${USER}_auth encrypt=no |
Due to the nature of OpenVPN, in order to set BaroPAM environment configuration files for each user account, a directory dedicated to BaroPAM environment configuration files (/usr/baropam/openvpn) is created as follows.
For reference, the secret parameter sets the name of the BaroPAM configuration file, and the encrypt parameter sets the encryption/decryption flag (yes or no) of the BaroPAM configuration file.
When entering a OTA key such as a password in the password input window (Password:) using forward_pass, enter the password first and then enter the OTA key without a space. For example, if the password is "baropam" and the OTA key is "123456", enter "baropam123456".
Using forward_pass, you can enable 2-factor authentication for most services that require authentication.
2) For FreeRADIUS integration
Due to the nature of OpenVPN, when setting up a separate BaroPAM configuration file for each user account, the setting method for setting the BaroPAM module in the /etc/pam.d/radiusd file is entered at the top as follows.
| [root] /usr/baropam > vi /etc/pam.d/radiusd #%PAM-1.0 auth required /usr/baropam/pam_baro_auth.so forward_pass secret=/usr/baropam/openvpn/.${USER}_auth encrypt=no |
For reference, the secret parameter sets the name of the BaroPAM configuration file, and the encrypt parameter sets the encryption/decryption flag (yes or no) of the BaroPAM configuration file.
When entering a OTA key such as a password in the password input window (Password:) using forward_pass, enter the password first and then enter the OTA key without a space. For example, if the password is "baropam" and the OTA key is "123456", enter "baropam123456".
Using forward_pass, you can enable 2-factor authentication for most services that require authentication.
5. OpenVPN connection test
5.1 Create new user
To create a new OpenVPN user, run the OpenVPN installation script to create a new user.
| [root]# ./openvpn-install.sh Welcome to OpenVPN-install! The git repository is available at: https://github.com/angristan/openvpn-install It looks like OpenVPN is already installed. What do you want to do? 1) Add a new user 2) Revoke existing user 3) Remove OpenVPN 4) Exit Select an option [1-4]: 1 ……… |
When a new user is created, the "Client name.ovpn" file, which is a profile necessary for connection using Openvpn client connect, is created in the user's home directory.
5.2 Create BaroPAM configuration file
To execute a shell script related to the user's login information (login-ID, phone number), go to the BaroPAM registration directory (/usr/baropam/openvpn) and execute it.
Note) When executing a shell script, arguments or argument values must be separated by spaces.
1) Shell script to create BaroPAM configuration file for new user - setuser.sh
#!/bin/sh
export LANG=C
ENV_HOME=/usr/baropam/radius;
ACC_HOME=/home/$1
userdel -rf $1
\rm ${ENV_HOME}/.$1_auth
useradd -d ${ACC_HOME} -m -s /bin/bash $1
echo "$1:$2" | chpasswd
\cp ${ENV_HOME}/.baro_auth ${ENV_HOME}/.$1_auth
sed -i "s/01012341234/$3/g" ${ENV_HOME}/.$1_auth
When running the shell script (setuser.sh) that creates the BaroPAM configuration file for a new user (login-ID), the parameters are as follows.
$1 : Login-ID to create
$2 : Password to create
$3 : Login-ID phone number
| [root]# sh setuser.sh nurit !@Baropam# 01027714076 |
2) Shell script to change the password of a user (login-ID) - setpasswd.sh
| #!/bin/sh export LANG=C echo "$1:$2" | chpasswd |
When executing the shell script (setpasswd.sh) to change the user (login-ID) password, the parameters are as follows.
$1 : Login-ID
$2 : Change password
| [root]# sh setpasswd.sh nurit !@Baropam# |
3) Shell script to change the phone number of a user (login-ID) - setphone.sh
| #!/bin/sh export LANG=C ENV_HOME=/usr/baropam/openvpn; sed -i "s/$2/$3/g" ${ENV_HOME}/.$1_auth |
The parameters when executing the shell script (setphone.sh) that changes the user's (login-ID) phone number in BaroPAM's configuration file are as follows.
$1 : Login-ID
$2 : Phone number before change
$3 : Phone number after change
| [root]# sh setphone.sh nurit 01012341234 01027714076 |
4) Shell script that changes the password and phone number of a user (login-ID) - chgpasswd.sh
| #!/bin/sh export LANG=C echo "$1:$2" | chpasswd sed -i "s/$3/$4/g" ${ENV_HOME}/.$1_auth |
The parameters when executing the shell script (setpasswd.sh) that changes the user (login-ID) password and phone number in the BaroPAM configuration file are as follows.
$1 : Login-ID
$2 : Change password
$3 : Phone number before change
$4 : Phone number after change
| [root]# sh chgpasswd.sh nurit !@Baropam# 01012341234 01027714076 |
5) Shell script to delete a user (login-id) - deluser.sh
| #!/bin/sh export LANG=C ENV_HOME=/usr/baropam/openvpn; ACC_HOME=/home/$1 userdel –rf $1 \rm ${ENV_HOME}/.$1_auth |
When executing the shell script (deluser.sh) to delete a user (login-ID), the parameters are as follows.
$1 : Login-ID to delete
| [root]# sh deluser.sh nurit |
5.3 OpenVPM connection test
The OpenVPN client configuration asks for a user, password, and verification code. The user is "baropam" and the password is an authentication token that can be generated by adding the BaroPAM authentication code to the password and verification code generated randomly above and sent to the user. So, if the password is "baropam" and the authentication code generated by the BaroPAM app is "183436", enter the openvpn prompt.
If everything works correctly, you should see something like this.
1) In case of Linux environment
| [root]# openvpn --config /home/baropam/baropam.ovpn Thu Dec 21 09:01:10 2023 Unrecognized option or missing or extra parameter(s) in /home/baropam/baropam.ovpn:18: block-outside-dns (2.4.12) Thu Dec 21 09:01:10 2023 OpenVPN 2.4.12 x86_64-redhat-linux-gnu [SSL (OpenSSL)] [LZO] [LZ4] [EPOLL] [PKCS11] [MH/PKTINFO] [AEAD] built on Nov 10 2023 Thu Dec 21 09:01:10 2023 library versions: OpenSSL 1.1.1k FIPS 25 Mar 2021, LZO 2.08 Enter Auth Username: baropam Enter Auth Password: ****** Thu Dec 21 09:01:35 2023 Outgoing Control Channel Encryption: Cipher 'AES-256-CTR' initialized with 256 bit key Thu Dec 21 09:01:35 2023 Outgoing Control Channel Encryption: Using 256 bit message hash 'SHA256' for HMAC authentication Thu Dec 21 09:01:35 2023 Incoming Control Channel Encryption: Cipher 'AES-256-CTR' initialized with 256 bit key Thu Dec 21 09:01:35 2023 Incoming Control Channel Encryption: Using 256 bit message hash 'SHA256' for HMAC authentication Thu Dec 21 09:01:35 2023 TCP/UDP: Preserving recently used remote address: [AF_INET]61.98.51.141:51194 Thu Dec 21 09:01:35 2023 Socket Buffers: R=[87380->87380] S=[16384->16384] Thu Dec 21 09:01:35 2023 Attempting to establish TCP connection with [AF_INET]61.98.51.141:51194 [nonblock] Thu Dec 21 09:01:36 2023 TCP connection established with [AF_INET]61.98.51.141:51194 Thu Dec 21 09:01:36 2023 TCP_CLIENT link local: (not bound) Thu Dec 21 09:01:36 2023 TCP_CLIENT link remote: [AF_INET]61.98.51.141:51194 Thu Dec 21 09:01:36 2023 TLS: Initial packet from [AF_INET]61.98.51.141:51194, sid=08897d04 ef24990c Thu Dec 21 09:01:36 2023 VERIFY OK: depth=1, CN=cn_PCzyQ4Y6veNJ1p4j Thu Dec 21 09:01:36 2023 VERIFY KU OK Thu Dec 21 09:01:36 2023 Validating certificate extended key usage Thu Dec 21 09:01:36 2023 ++ Certificate has EKU (str) TLS Web Server Authentication, expects TLS Web Server Authentication Thu Dec 21 09:01:36 2023 VERIFY EKU OK Thu Dec 21 09:01:36 2023 VERIFY X509NAME OK: CN=server_h84bYsnVsqSFo8h7 Thu Dec 21 09:01:36 2023 VERIFY OK: depth=0, CN=server_h84bYsnVsqSFo8h7 Thu Dec 21 09:01:36 2023 Control Channel: TLSv1.3, cipher TLSv1.3 TLS_AES_256_GCM_SHA384, 256 bit EC, curve: prime256v1 Thu Dec 21 09:01:36 2023 [server_h84bYsnVsqSFo8h7] Peer Connection Initiated with [AF_INET]61.98.51.141:51194 Thu Dec 21 09:01:37 2023 SENT CONTROL [server_h84bYsnVsqSFo8h7]: 'PUSH_REQUEST' (status=1) Thu Dec 21 09:01:37 2023 PUSH: Received control message: 'PUSH_REPLY,dhcp-option DNS 192.168.33.10,dhcp-option DNS 192.168.33.1,route 10.99.0.0 255.255.255.0,route 192.168.33.0 255.255.255.0,redirect-gateway def1 bypass-dhcp,route-gateway 10.99.0.1,topology subnet,ping 10,ping-restart 120,ifconfig 10.99.0.3 255.255.255.0,peer-id 0,cipher AES-128-GCM' Thu Dec 21 09:01:37 2023 OPTIONS IMPORT: timers and/or timeouts modified Thu Dec 21 09:01:37 2023 OPTIONS IMPORT: --ifconfig/up options modified Thu Dec 21 09:01:37 2023 OPTIONS IMPORT: route options modified Thu Dec 21 09:01:37 2023 OPTIONS IMPORT: route-related options modified Thu Dec 21 09:01:37 2023 OPTIONS IMPORT: --ip-win32 and/or --dhcp-option options modified Thu Dec 21 09:01:37 2023 OPTIONS IMPORT: peer-id set Thu Dec 21 09:01:37 2023 OPTIONS IMPORT: adjusting link_mtu to 1626 Thu Dec 21 09:01:37 2023 OPTIONS IMPORT: data channel crypto options modified Thu Dec 21 09:01:37 2023 Outgoing Data Channel: Cipher 'AES-128-GCM' initialized with 128 bit key Thu Dec 21 09:01:37 2023 Incoming Data Channel: Cipher 'AES-128-GCM' initialized with 128 bit key Thu Dec 21 09:01:37 2023 ROUTE_GATEWAY 192.168.33.1/255.255.255.0 IFACE=ens33 HWADDR=00:50:56:8b:88:28 Thu Dec 21 09:01:37 2023 TUN/TAP device tun1 opened Thu Dec 21 09:01:37 2023 TUN/TAP TX queue length set to 100 Thu Dec 21 09:01:37 2023 /sbin/ip link set dev tun1 up mtu 1500 Thu Dec 21 09:01:37 2023 /sbin/ip addr add dev tun1 10.99.0.3/24 broadcast 10.99.0.255 Thu Dec 21 09:01:37 2023 /sbin/ip route add 61.98.51.141/32 via 192.168.33.1 Thu Dec 21 09:01:37 2023 /sbin/ip route add 0.0.0.0/1 via 10.99.0.1 |
2) In case of Windows environment
In the case of Windows environment, after installing OpenVPN, import the "Client name.ovpn" file, which is a profile required for connection, to the OpenVPN GUI using the Openvpn client connect created when creating a new user, and then proceed with the login test.

6. BaroPAM application
6.1 BaroPAM application process
The application procedure for entering the OTA key generated by the "BaroPAM" app in the "Request Value" field of the Verification code on the OpenVPN login screen is as follows.

6.2 BaroPAM application screen
The application procedure for entering the OTA key generated by the "BaroPAM" app in the "Request Value" field of the Verification code on the OpenVPN login screen is as follows.

6.3 Identity verification application process
When you select the login information item to generate a 2nd authentication key (OTA key) because you were unable to obtain the device information of your iPhone, you may not be moved to the "OTA key" creation screen.
In addition, it is necessary to apply a separate identity verification function to prevent unauthorized use of someone else's phone number, and the "BaroPAM" app applies its own algorithm to perform its own identity verification process.

6.4 Identity verification application screen
When you select the login information item to generate a 2nd authentication key (OTA key) because you were unable to obtain the device information of your iPhone, you may not be moved to the "OTA key" creation screen.
In addition, it is necessary to apply a separate identity verification function to prevent unauthorized use of someone else's phone number, and the "BaroPAM" app applies its own algorithm to perform its own identity verification process.
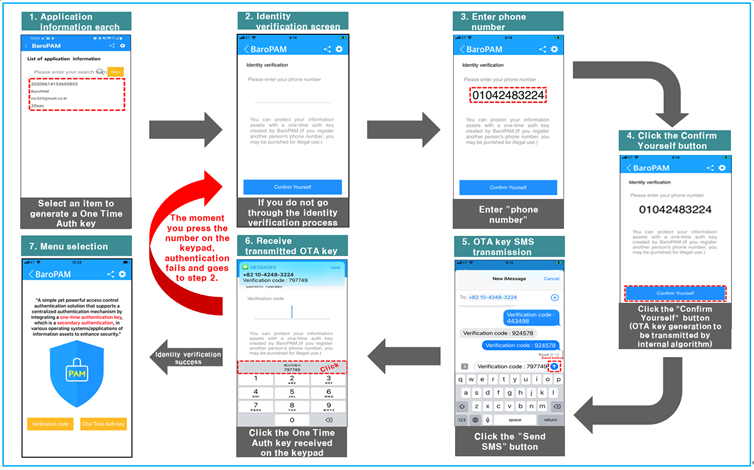
Note) If the OTA key sent by SMS is received but it is not displayed on the keyboard or the OTA key sent by SMS is not received.

If the OTA key is not displayed on the keyboard like the screen above, be sure to set up a more convenient password auto-completion function from iOS12 (Go to iPhone's "Settings" -> "Passwords" -> "AutoFill Passwords" -> "Allow") Confirmation should be done.
6.5 OpenVPN Login
To strengthen the security of OpenVPN, enter "Username" on the login screen, if the password is "baropam" and the authentication code generated by the BaroPAM app is "360931 enter "baropam360931" at the password prompt and click "OK" at the bottom. Click the button.

7. About BaroPAM

Version 1.0 - Official Release - 2016.12.1
Copyright ⓒ Nurit corp. All rights reserved.
Company: Nurit Co., Ltd.
Registration Number: 258-87-00901
CEO: Jongil Lee
Tel: +82-2-2665-0119(Technical support, sales inquiry)
email: mc529@nurit.co.kr
Address: #913, 15, Magokjungang 2-ro, Gangseo-gu, Seoul (Magok-dong, Magok Techno Tower 2)
'▶ BaroSolution > 가이드' 카테고리의 다른 글
| BaroPAM Solution Installation Summary (Linux) (0) | 2023.08.22 |
|---|---|
| BaroPAM Solution Integration Summary (Java) (0) | 2023.08.21 |
| BaroPAM integration Guide(Tomcat console) (0) | 2023.08.18 |
| Tomcat 콘솔에서 사용자 식별 및 인증을 위한 다계층 인증 솔루션인 BaroPAM 솔루션의 적용 가이드 (0) | 2023.08.17 |
| OpenVPN 환경에서 사용자 식별 및 인증을 위한 다계층 인증 솔루션인 BaroPAM 솔루션의 적용 가이드 (0) | 2023.08.09 |